Step motor firmware
upgrade;
S_M_D
For technicians!
General
 The firmware of stepper motors in the serial number
range from 31200 000 to 31200 271 have to be upgraded, the reason is probably
the modification of the hardware reset circuit.
The firmware of stepper motors in the serial number
range from 31200 000 to 31200 271 have to be upgraded, the reason is probably
the modification of the hardware reset circuit.
This upgrade implements the software reset as “brown-out detection”; the
controller stays in reset until the power rose up to 4.0V and only then starts
the controller, after switch on.
The previous version of the firmware together with the new, modified hardware
produced address modification of the motors; the motor lost its address or two
motors had the same address and were no more reachable for the software; it
seemed to be the motor or its electronics is faulty.
Important
The AVR tools, AVR studio4 and the firmware files of the stepper motors
are stored in this description in compressed form. Before upgrading, the
compressed content must be expanded before use; only then related links will be
available.
· Please run the
file “...Website\Descriptions\Files_\ATMEL\”Firmware_312 00.exe”
Contents
Start the
Atmel programmer software
Install
“Atmel AVR Tools” and “AVR Studio 4”
·
Service
program “SlideScannerService.exe”
·
Installed version of
“Atmel AVR Tools” and “AVR Studio 4”
·
AVRISP mkII In system programmer unit
·
Program “Serial.exe’
·
Hexagon
key wrenches 1.5,
·
Network connection to the server
·
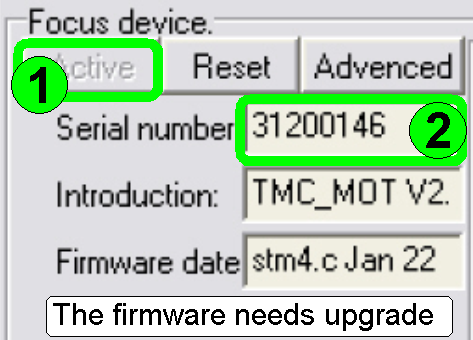 Read the serial number with the Low Level Service part
of the service program, check it for upgrade and memorize it if necessary.
Read the serial number with the Low Level Service part
of the service program, check it for upgrade and memorize it if necessary.
·
In the following, this serial number (this motor) is
used as example; the serial number is inside the range from 31200 000 to 31200
271.
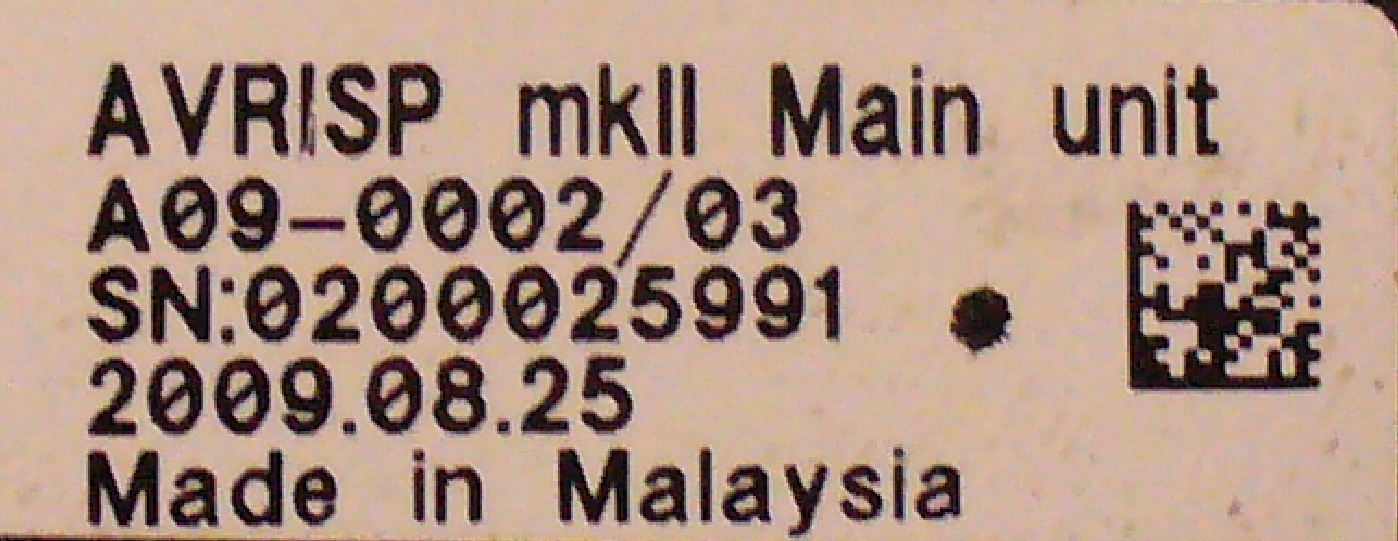
·
The serial number is found also on the housing of the
motor and on the controller itself.
1.
 Switch off the
power supply of the scanner.
Switch off the
power supply of the scanner.
2.
Remove the 3 bolts of the stepper motor’s
electronics cover and the
cover itself.
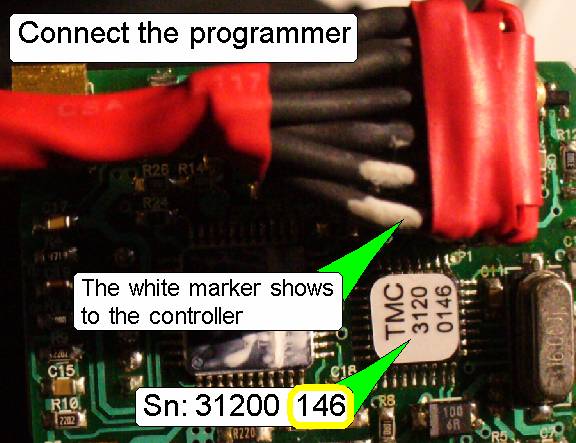
3.
Compare the serial number on the controller with the
serial number, read with the service program; they should be equal.
4.
Connect the programmer cable connector pins into the
socket of the firmware update connector; the white marker on the cable shows to
the controller.
5.
Connect the programmer to an USB 2.0 port; connect the
stepper motor cable if it was removed previously.
6.
Switch on the
power supply of the scanner.
Start the Atmel programmer software

Start the “Atmel AVR Tools” and “AVR Studio

 1. Select “AVR”
2.
In the tab “
3.
select AT mega 8.
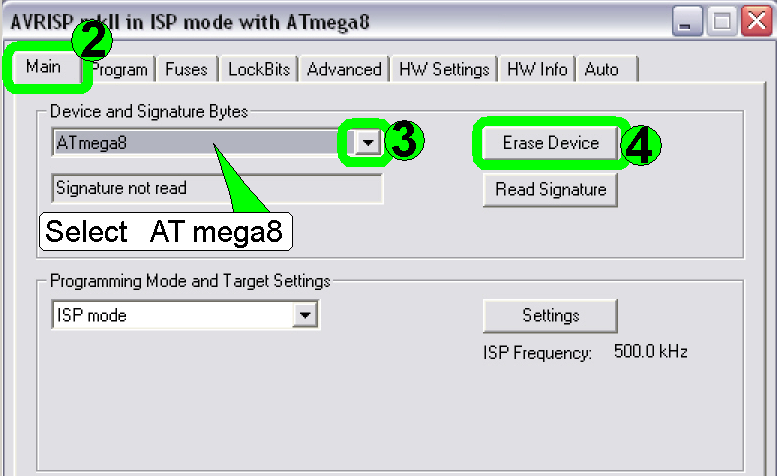
4.
Press “Erase Device”.
5.
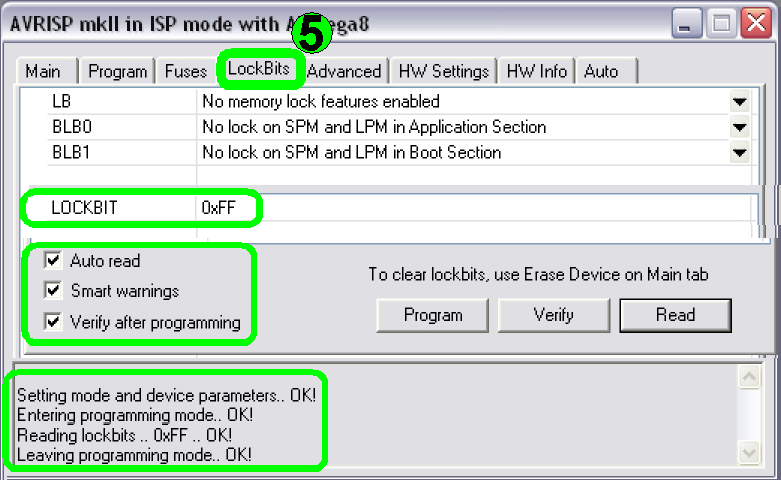 In the tab “Lock Bits” check the settings as shown.
If LOCKBIT differs from 0xFF, the settings are incorrect.
6.
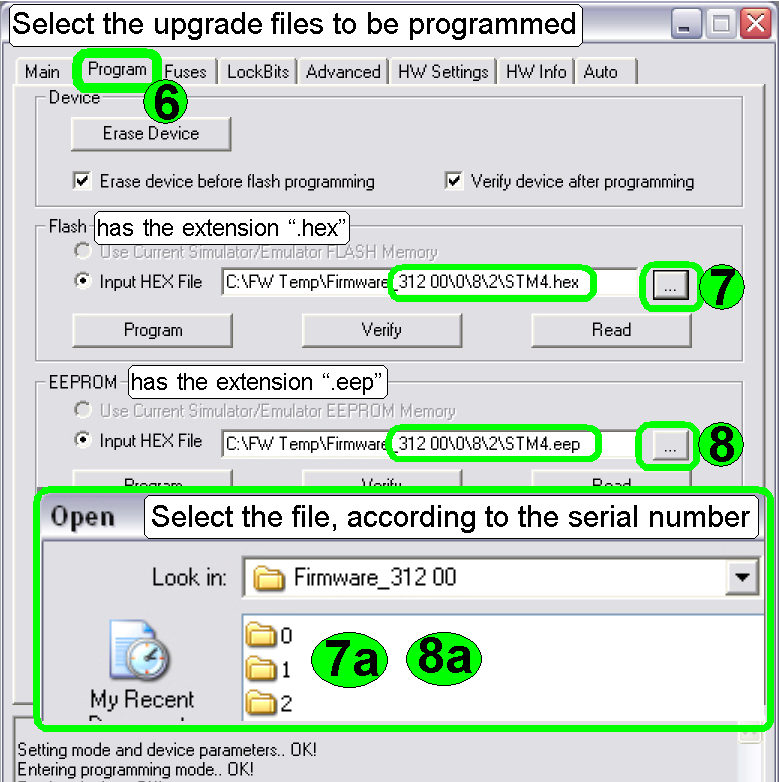
In the tab “Program” Select the files to be programmed
(7, 8).
7.
In this pull down menu find the Flash file with the extension
“hex” in order to the serial number.
Find the directory “Firmware_31200”; the
following directories (7a; 8a) containing all the files with the first digit of
the serial number to be upgraded, in our example, we have to open the folder “
In the directory “
In the directory “
In this folder select the file with the
extension “hex”, STM4.hex (7b).
 Repeat the steps described in the step 7 with the file
for the EEPROM; in the last folder select the file with the extension “eep”;
STM4.eep (8b).
Repeat the steps described in the step 7 with the file
for the EEPROM; in the last folder select the file with the extension “eep”;
STM4.eep (8b).
8.
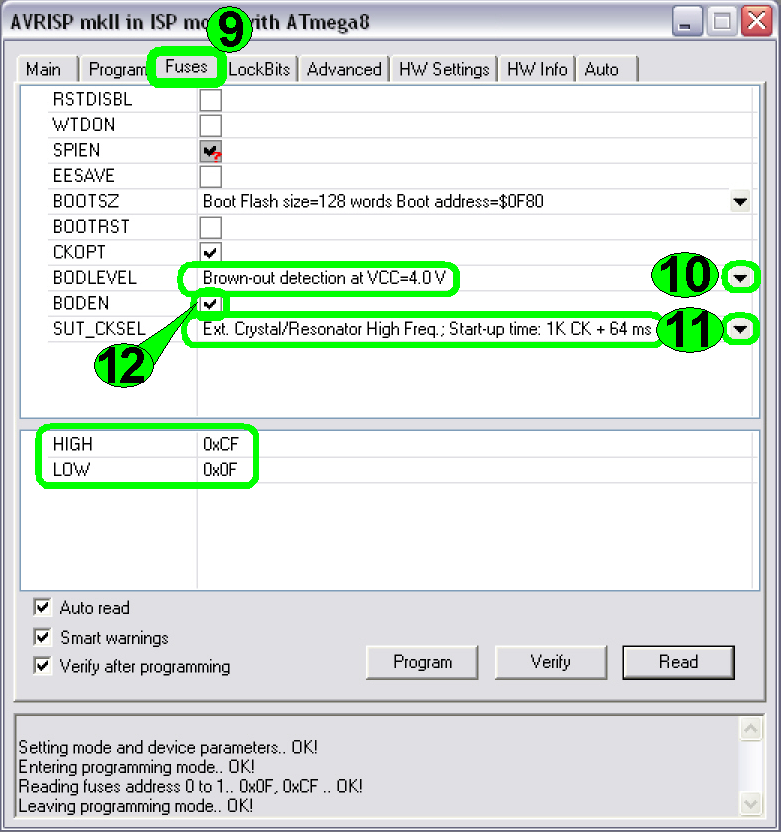
Select the tab “fuses”.
9.
Select Brown-out detection at Vcc=4.0V.
10. Select Ext.
Crystal/Resonator HighFreq. Start up
time: 1K CK+64ms.
11. Check the checkbox
BODEN
Check the values for HIGH and LOW as shown.
HIGH = 0xCF
LOW = 0x0F
If these values are not met,
previous settings are incorrect.
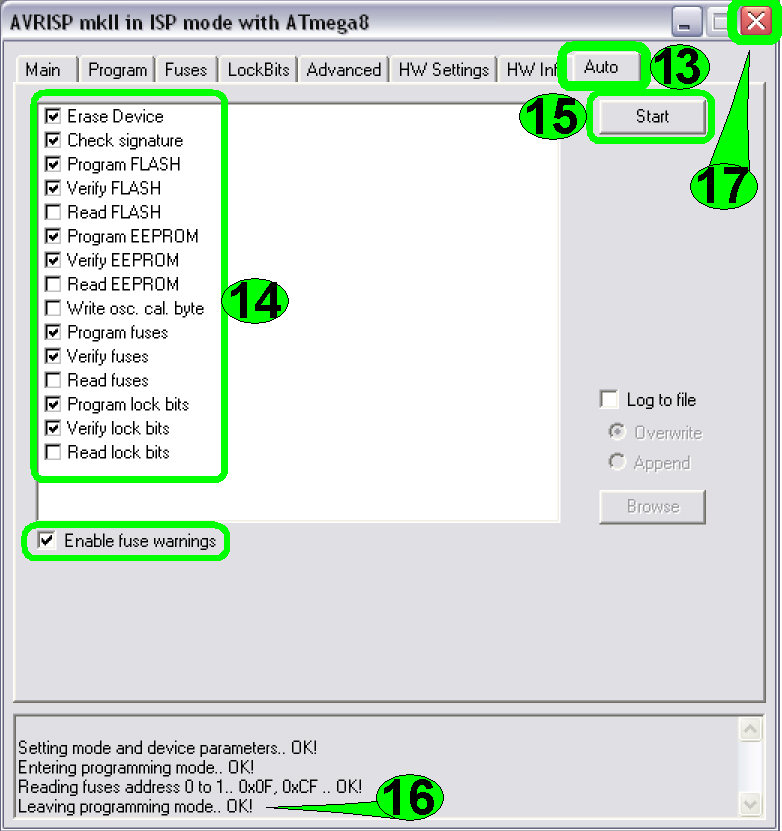
12. Select the tab
“Auto”
13. Check the settings
as shown.
14. Press Start
15. Check for
finishing the programming.
16. Leaf the program
with “Exit”.
If any error or mistake occurred or the programming procedure is not finished
with OK, repeat the procedure from step 2.
Disconnect the programmer from the firmware upgrade connector of the
motor.
If the firmware upgrade of the motor is finished, please check the
serial number of the motor with the service program, see above “Prearrangements”. The
serial number should be the same as before the upgrade procedure; otherwise, do
the upgrade procedure again.
After the firmware upgrade is finished successful, the address of the
stepper motor inside the scanner must be set, because the programmed files
containing the address “
 The address number of the unit can be defined or
modified with the program “Serial.exe’.
The address number of the unit can be defined or
modified with the program “Serial.exe’.
The following procedure can be left out, if the address of the motor
used in the scanner is 03, the X-motor; if the firmware of the X-motor was
upgraded.
Switch off the power supply of the scanner.
Disconnect all stepper motor cables from the stepper motor electronics;
except the cable of the motor, that address should be modified.
Switch on the power supply of the scanner.
Start the program “Serial.exe”;
it can be found in the folder:
 …
website\Descriptions\Files_\Serial.exe
…
website\Descriptions\Files_\Serial.exe
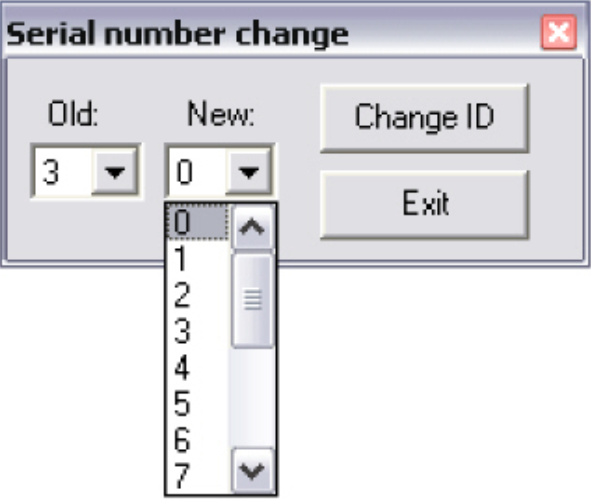
Select the actual address of the stepper motor to be changed in the menu
“Old”.
In the menu “New” select the number of the motor address, used in the scanner;
in our example 05.
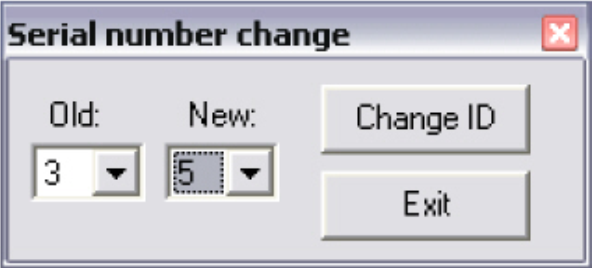 In our example, we defining the actual address (03 =
X-motor) to the address of the focus motor (05 = Focus motor).
In our example, we defining the actual address (03 =
X-motor) to the address of the focus motor (05 = Focus motor).
Press “Change ID”.
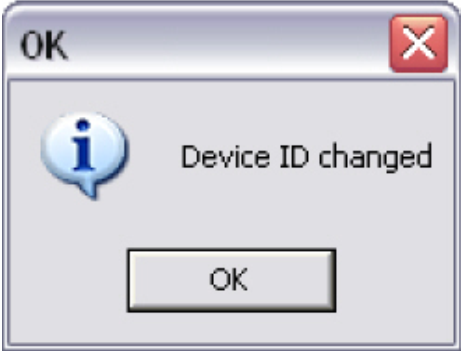

If the settings are correct, press “Yes”.
Leave the program with “OK” and press “Exit”.
Switch off the power supply, mount the focus unit, connect the cables to
the motors, switch on the power supply and check the correct function of all motors
with the help of the service program.
Check the serial number of the motor (that was firmware upgraded) with
the service program, see above “Prearrangements”. The
serial number should be the same as before the upgrade procedure.
If the focus motor (and all other motors also) working correctly, switch
off the power supply and mount the cover of the focus motor electronics.
Stick the label “FOK” (Firmware upgrade OK) onto the motor housing near
to the serial number of the motor; so it is visible from outside that the
procedure was done.
Update the upgrade action in the file
<Server>:\3DHWork\Production_Sales_Logistics\Production\
2010_01_20_Átcímződés_motor_lista.xls
Install the
“Atmel AVR Tools” and “AVR Studio
·
 On the home
page of ATMEL find the version “AVR Studio 4.18
(build 684)” (or use
the most recent version) and load it down after registering.
On the home
page of ATMEL find the version “AVR Studio 4.18
(build 684)” (or use
the most recent version) and load it down after registering.
o A less recent version (used in
the demo example above) can be found in:
...
website/Descriptions\Files_\ATMEL\AVRStudio\ aStudio4b589.exe
·
Execute the downloaded setup software; after
installing, the program is found in “Start”, “All Programs” ...
·
Copy the folder “Firmware_31200”
to the hard disk to a specified place, e.g. “C:\ Firmware_31200”.
·
Continue with “Prearrangements”
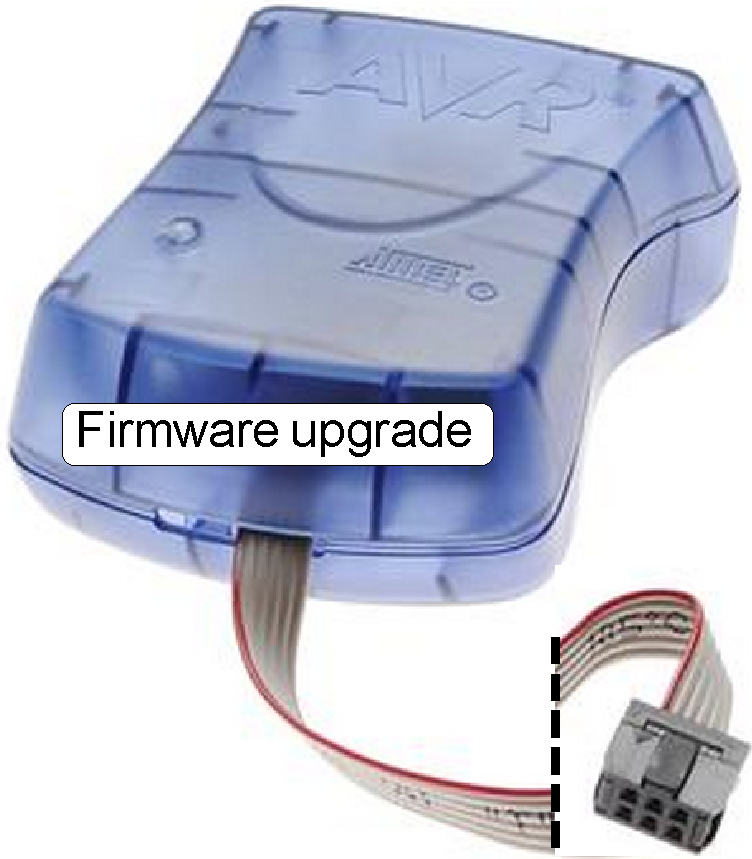
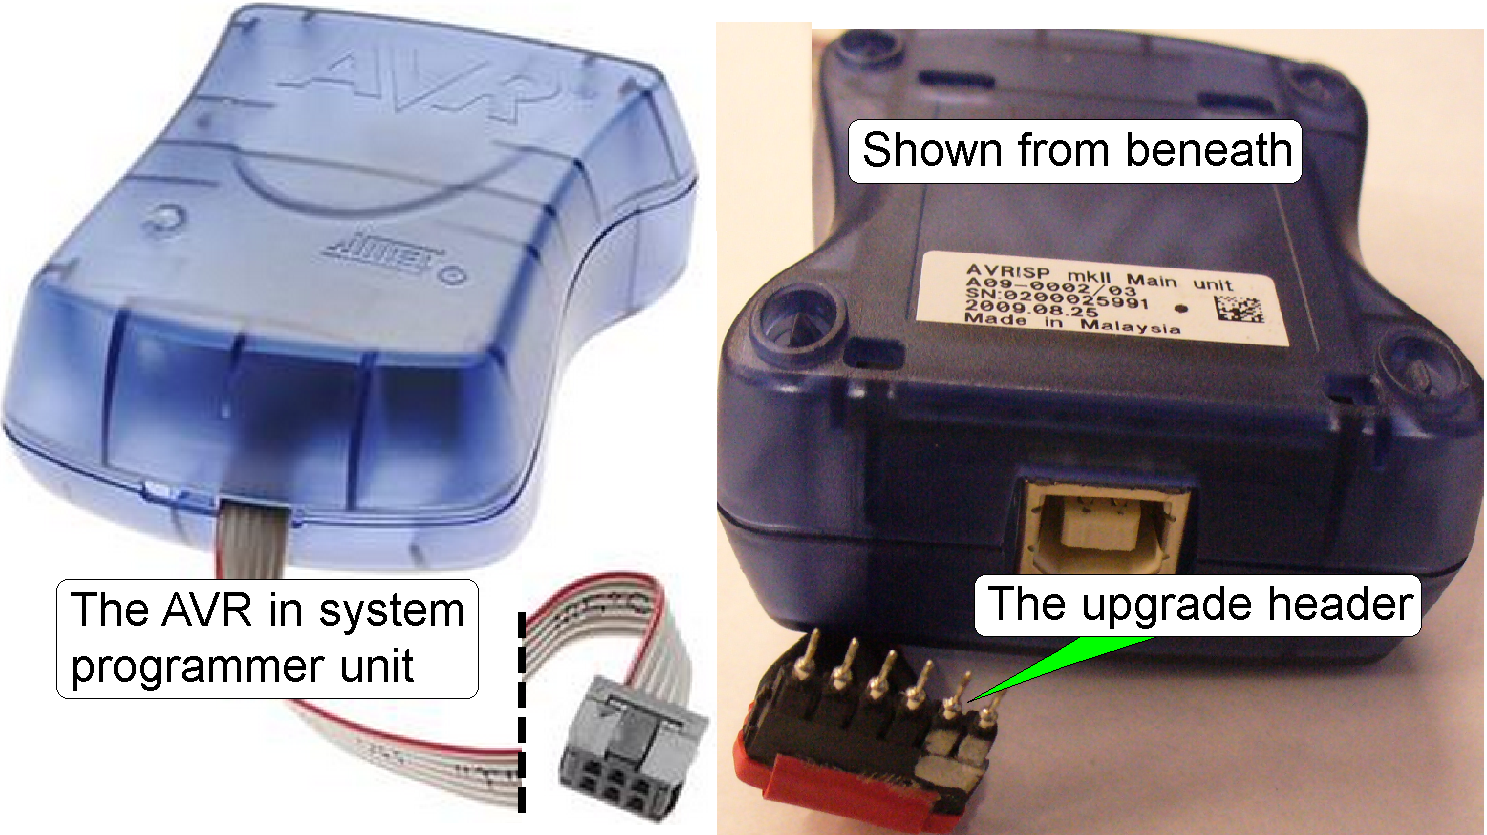
 The “AVRISP mkII Main
unit” is used to realize the connection between the stepper motor
controller and the software “AVR Studio
The “AVRISP mkII Main
unit” is used to realize the connection between the stepper motor
controller and the software “AVR Studio
The pins
(connections) of the AVR programmer header must be modified to the upgrade
header, used in the stepper motor controller.
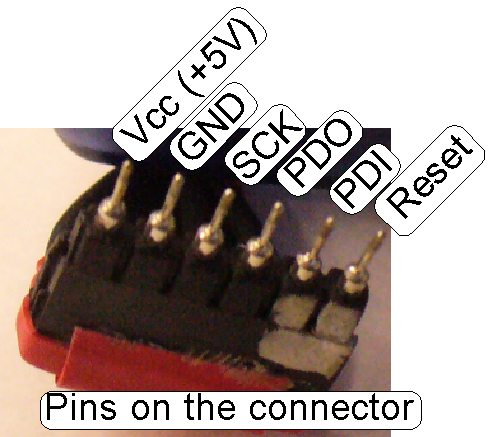
2. PDI Program data
input to the motor controller
3. PDO Program data
output from the motor controller
4. SCK Serial clock
5. GND Ground
6. Vcc Power supply,
+5V
·
Continue with “Prearrangements”
End