Cleaning
optics
For technicians!
 This chapter describes
used materials, tools, techniques and procedures to cleaning mirror surfaces,
lenses and other optics components; used in Pannoramic
scanners. If dust or fingerprints are the reason for the unwanted appearance in
the view, the optical component has to be found on which the contamination is
situated on. Therefore, a procedure is added also to determine which optical
component may contain the contamination.
This chapter describes
used materials, tools, techniques and procedures to cleaning mirror surfaces,
lenses and other optics components; used in Pannoramic
scanners. If dust or fingerprints are the reason for the unwanted appearance in
the view, the optical component has to be found on which the contamination is
situated on. Therefore, a procedure is added also to determine which optical
component may contain the contamination.
Contents
Tools
and materials
 To clean optical
surfaces includes always the risk of scratching or other kind of damaging the
optics or to make it unusable; therefore cleaning
of optics to be on the safe side is not recommended!
To clean optical
surfaces includes always the risk of scratching or other kind of damaging the
optics or to make it unusable; therefore cleaning
of optics to be on the safe side is not recommended!
On the other side,
dirt, grease, fingerprints or dust may reduce the quality of the virtual tissue
drastically; so, to increase the quality of the virtual tissue, cleaning of the
appropriate optical part might be unavoidable. Furthermore, different kind of
contamination (dust, fingerprint, grease) might need different tools or
procedures to remove them.
Important
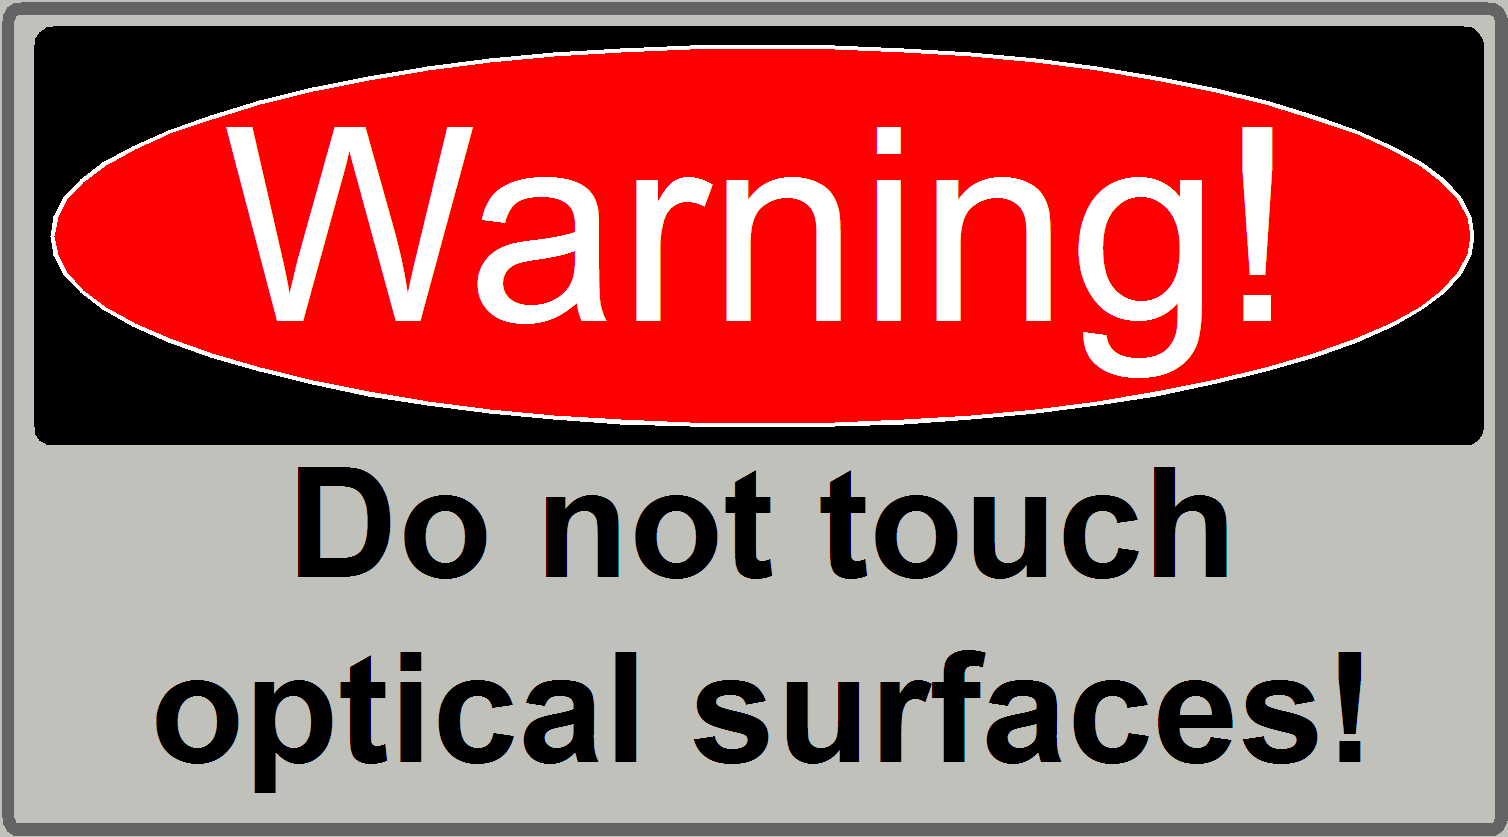
Never use pressure on
the optics surface; never rub to remove contaminations from optical surfaces!
�
If you are not sure, whether to clean an optical
surface or not, do not proceed! All
these things are reasons to avoid cleaning of optics;
�
The best way, to avoid cleaning of optics, is
prevention.
Important
3DHISTECH accepts no liability under any
circumstances for damage of optics, optical parts or optical surfaces during
the cleaning procedure performed by the user!
The use of the following information,
described procedures and used materials is exclusively at the risk of the user!
The following
recommended materials and procedures are tested and the optics was free of
contamination after cleaning; but persistent dust or dirt had not to be removed
until now.
The best way to avoid
cleaning of the optics is the use of the scanner in dust free surroundings and
to protect the entire scanner with a dust protecting mantle if the scanner is
not in use.
Precautions
to avoid cleaning of optical components
�
 Never touch optical
surfaces with fingers or not recommended tools; touch always the mounting only.
Never touch optical
surfaces with fingers or not recommended tools; touch always the mounting only.
�
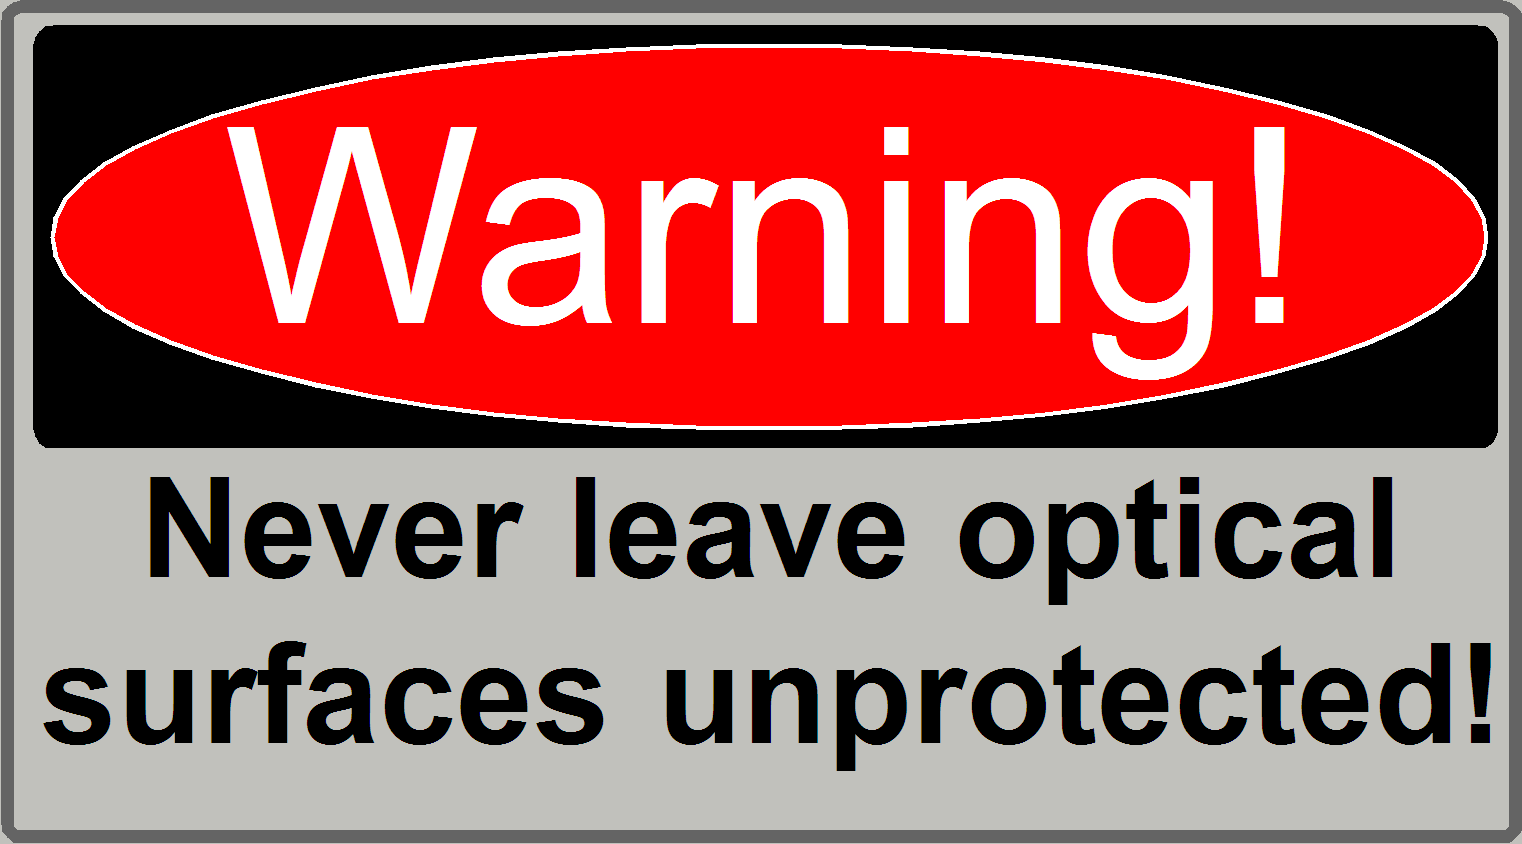
Never leave the lenses or mirrors, dust cups or units,
that including optical components (e.g. cameras or camera adapters), uncovered
in the room; optical surfaces should be protected and covered always
immediately by the use of dust cups, plastic bags or elsewhere, if they are
even not in use or stored.
�
Check dust cups and other dust protecting means of cleanness.
If these means are dusty, the dust may be easily transmitted onto the surface
to be protected.
�  Never use any aerosol
spray products to remove dust from optics.
Never use any aerosol
spray products to remove dust from optics.
� Never use paper
handkerchiefs; these SCRATCH the optics.
� Never use �beauty�
cotton balls or pads; they are frequently contaminated by other materials.
�
Never use mains water or ion exchanged water (often
used for batteries). If water should be used to clean optics, use only
distilled water.
�
Never use any cleaning materials, made by common known
�household� companies, for optics.
To reduce the danger of
contamination of the cleaning materials and tools with dust, use a cleanable
plastic box to protect and store them; furthermore, leave all the tools and
unused materials in their original package until use. After the cleaning
procedure is finished, return the tools and materials into the plastic box.
Used one way materials have to be disposed. Materials like finger coats,
cleaning tissues and cotton balls or pads are one way products; cleaning
tissues and cotton pads have to be used for one wipe only. During the cleaning
procedure never use pressure; do not press the cleaning materials onto the
optics surface to be cleaned. The weight of the cleaning material itself is
often enough and defines the force onto the surface.
If you are using other
materials or solutions, check the materials of consisting unwanted components,
cleanness and lint-freeness; check the procedures also of scratch freeness.
Sterile packed 100% cotton materials, used in the medicine or for surgeries can
be used almost unhesitatingly, but check them of lint-freeness.
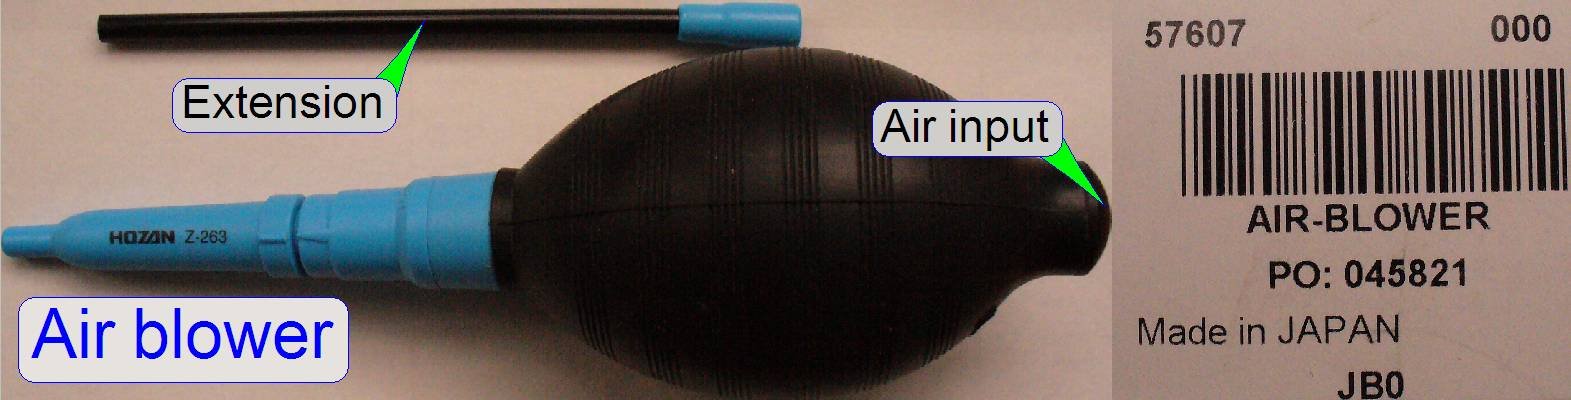 By using a manual air
blower, loosen dust can be removed easily.
By using a manual air
blower, loosen dust can be removed easily.
Do not use canned air
cleaner products for optics; the composition is often not exactly known and may
contain contaminations; these may damage the optics surface or the coating.
Furthermore, if a powerful air blow reaches the optics surface, the existing
dust particles on the optics may scratch the surface or coating immediately!
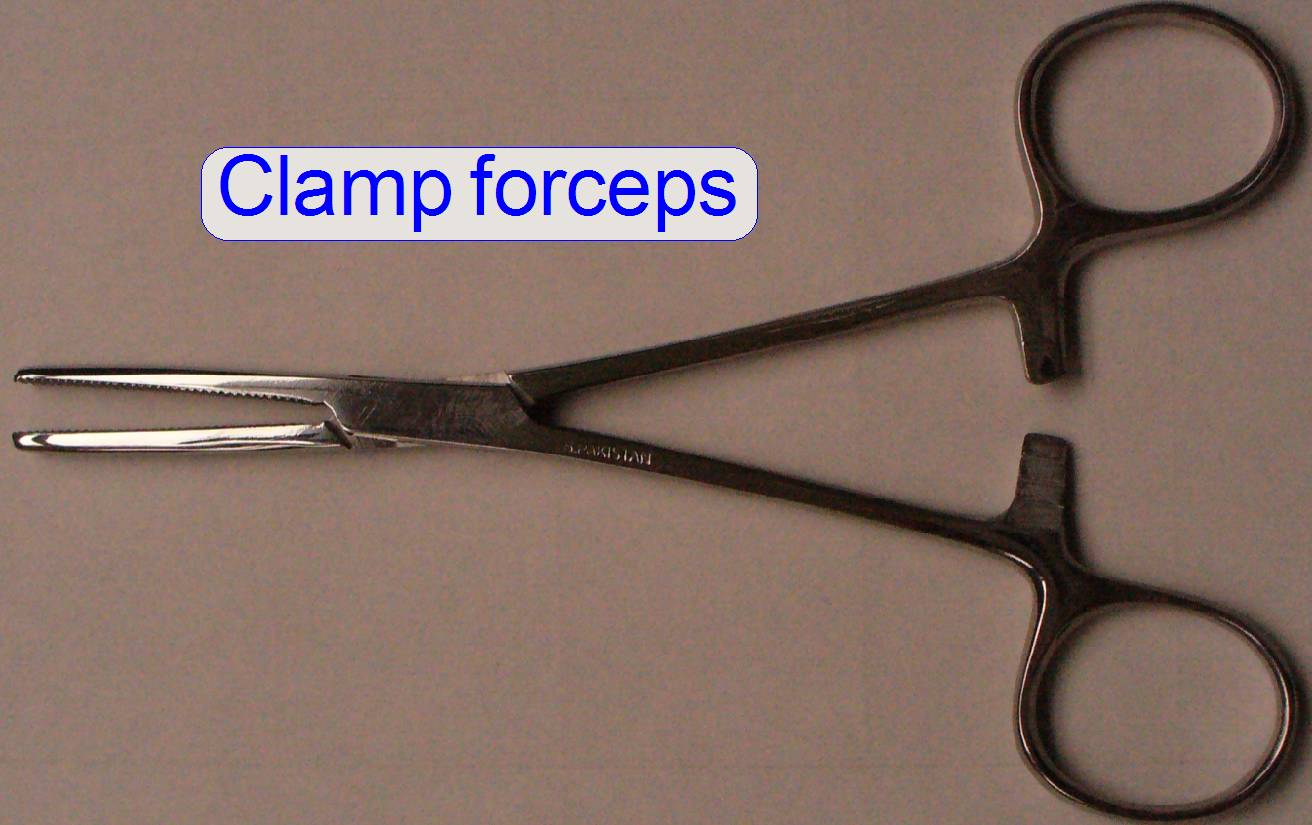 To grip and hold lens
cleaning tissues or cotton pads a clamp forceps is very helpful.
To grip and hold lens
cleaning tissues or cotton pads a clamp forceps is very helpful.
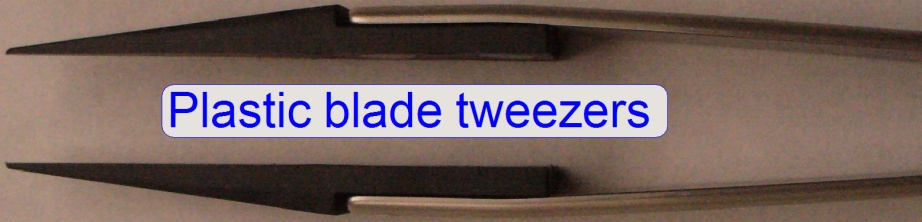 Any kind of cleaning
materials like cotton batting, cleaning tissues or cotton pads can also be hold
by a plastic tweezers.
Any kind of cleaning
materials like cotton batting, cleaning tissues or cotton pads can also be hold
by a plastic tweezers.
�
The cotton material to be hold should fully cover the
peaks of the tweezers and should keep a thick coating to prevent touching the
surface with the peaks.
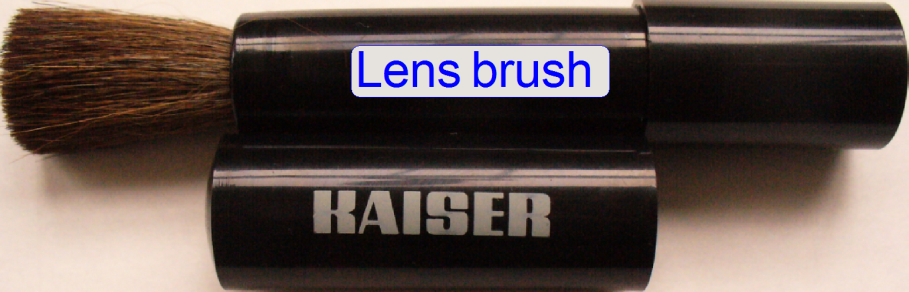 To clean lens surfaces
or to remove lint, special lens brushes can be used. The use of the lens brush
for mirror surfaces is not recommended. The lens brush should be cleaned or
replaced from time to time, because the dust will adhere to the hairs of the
brush.
To clean lens surfaces
or to remove lint, special lens brushes can be used. The use of the lens brush
for mirror surfaces is not recommended. The lens brush should be cleaned or
replaced from time to time, because the dust will adhere to the hairs of the
brush.
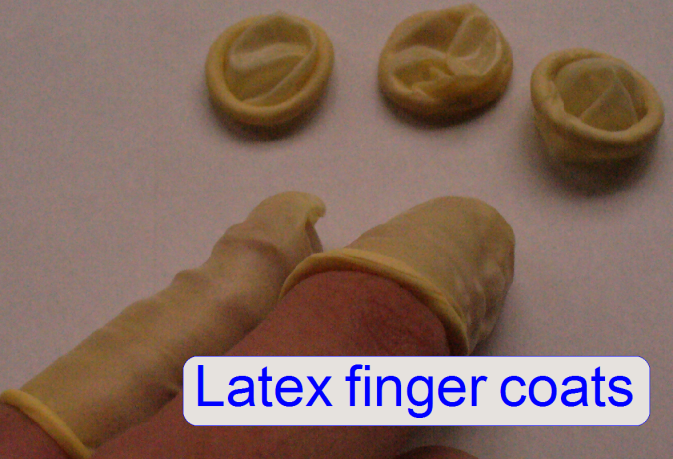 To protect optics from
fingerprints during execution of the cleaning procedure, finger coats are used;
even so, used materials will not be contaminated if they are touched. Latex
gloves may also be used.
To protect optics from
fingerprints during execution of the cleaning procedure, finger coats are used;
even so, used materials will not be contaminated if they are touched. Latex
gloves may also be used.
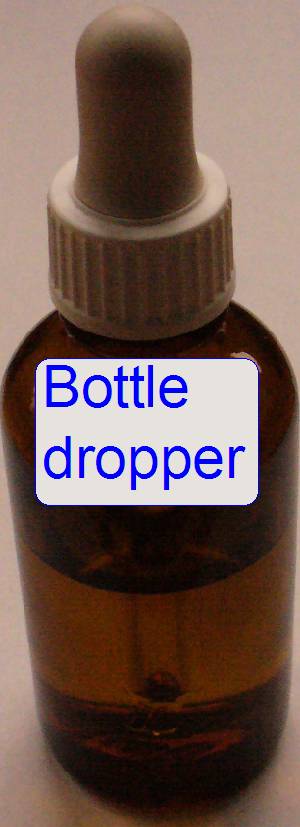
The liquid, used to
clean optical surfaces can be dosed excellent by a bottle dropper.
The used liquid is 96%
- 98% ethanol or methanol; available in any pharmacy, the bottle dropper also.
High concentrated
ethanol or methanol is very hygroscopic. After some drops of liquid is dropped
onto the cleaning material, close the bottle immediately, never leave the
bottle unclosed.
To avoid contamination
of the cleaning liquid, the pipette should never touch the material where the
liquid is dropped on.
Take into account that
such liquids are very flammable. The quantity in stock of the liquid for such
cleaning projects must not exceed 1l; otherwise special fire prevention
measures have to be taken!
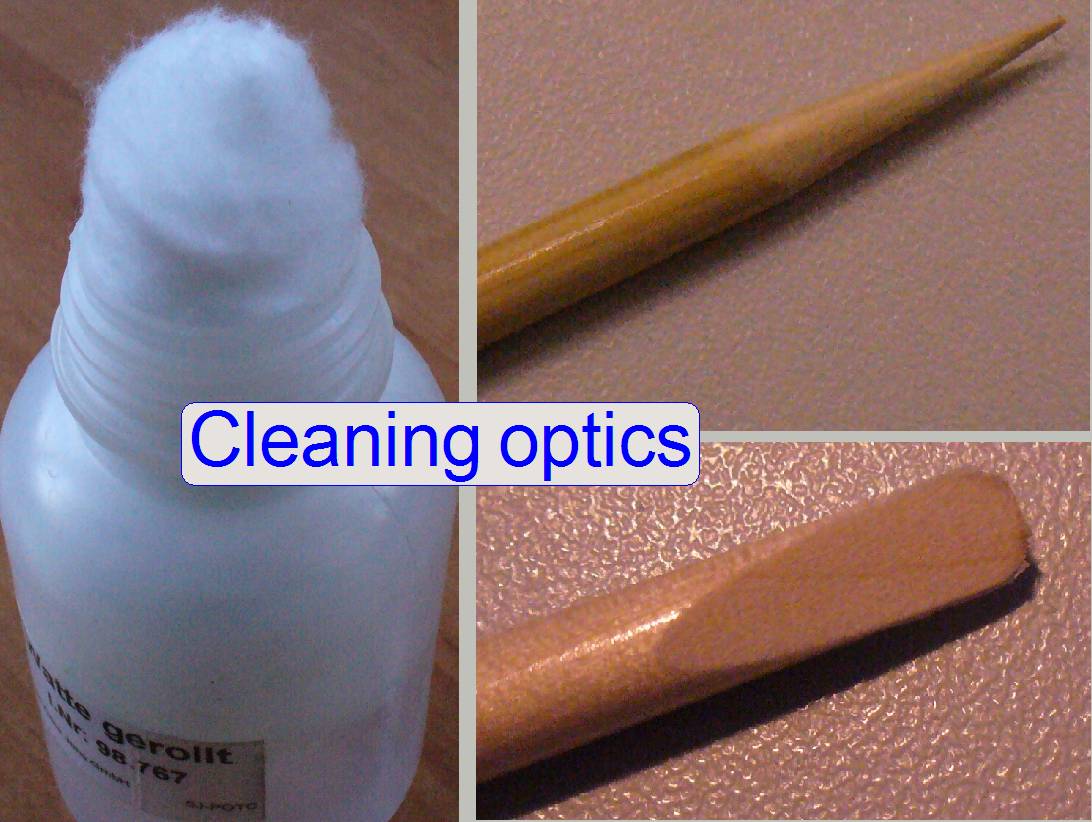
������������������������ Cotton
batting
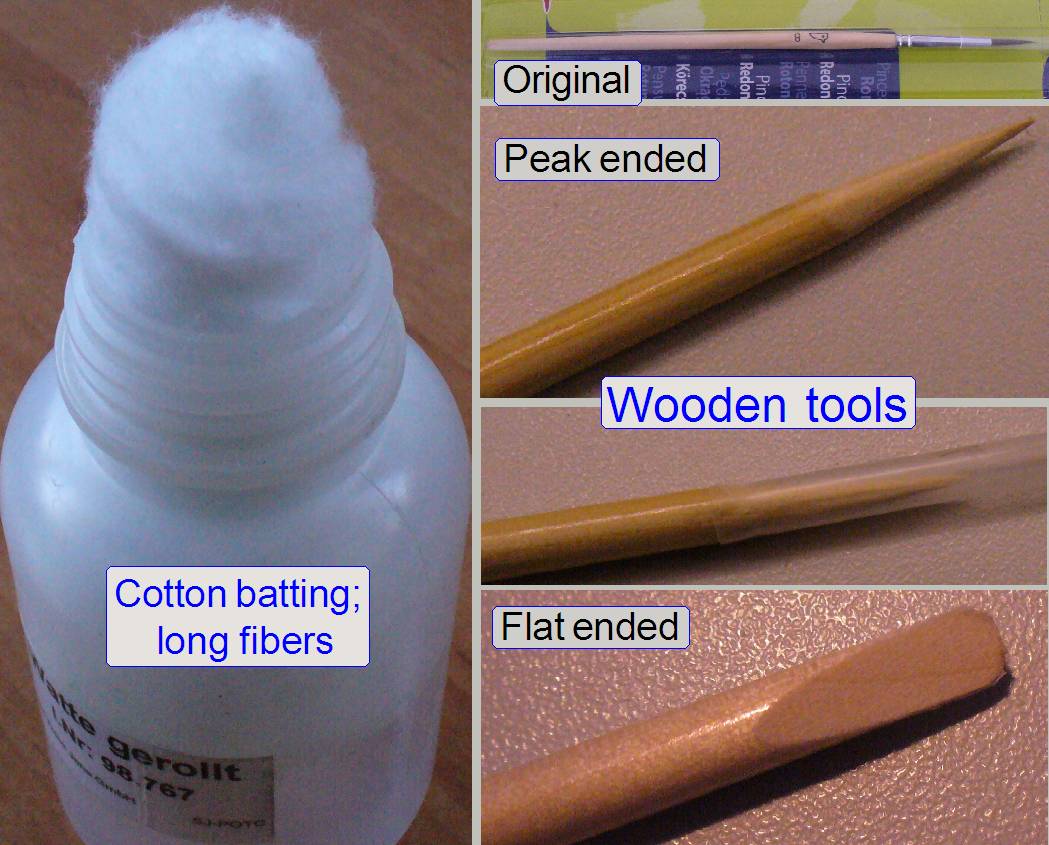 For some optical
surfaces, like the objective lenses, a very thin tool with cotton batting is
used for the cleaning procedure; the cotton batting should be 100% cotton with
long fibers if possible. Long fibers reduce the probability of remaining lint
on the lens surface.
For some optical
surfaces, like the objective lenses, a very thin tool with cotton batting is
used for the cleaning procedure; the cotton batting should be 100% cotton with
long fibers if possible. Long fibers reduce the probability of remaining lint
on the lens surface.
������������������������������������� Wooden or
bamboo tools
To reach the lens
surface of the objective on the tissue side, a peak ended wooden tool was
created; to clean the lens surface on the camera side a flat ended tool can be
used.
The tool was created
from a small, low priced paint brush. After removing the brush part, the
remaining stick was prepared as shown. A roughened surface of the tool ends
increases the adherence of the cotton.
� To create bamboo tools,
Asian chopsticks are very well suited as basic material.
�
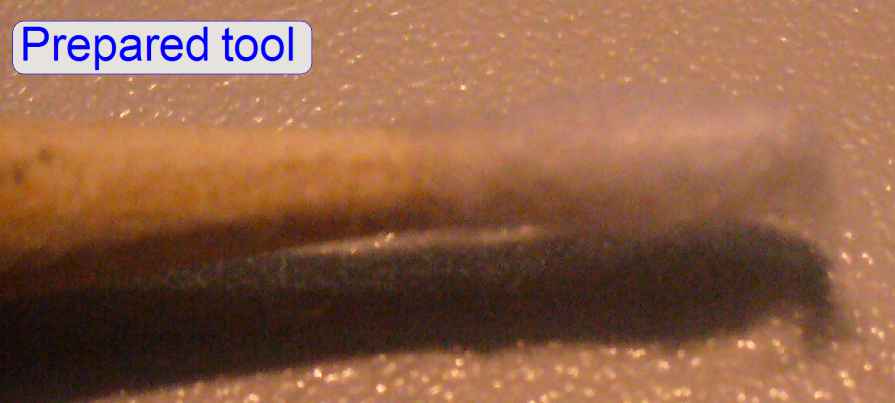 Wrap an amount of
cotton (depending on the size of the area to be cleaned) over the peak or the
flat ended part of the tool.
Wrap an amount of
cotton (depending on the size of the area to be cleaned) over the peak or the
flat ended part of the tool.
�
The end of the tool has
to be fully coated by cotton.
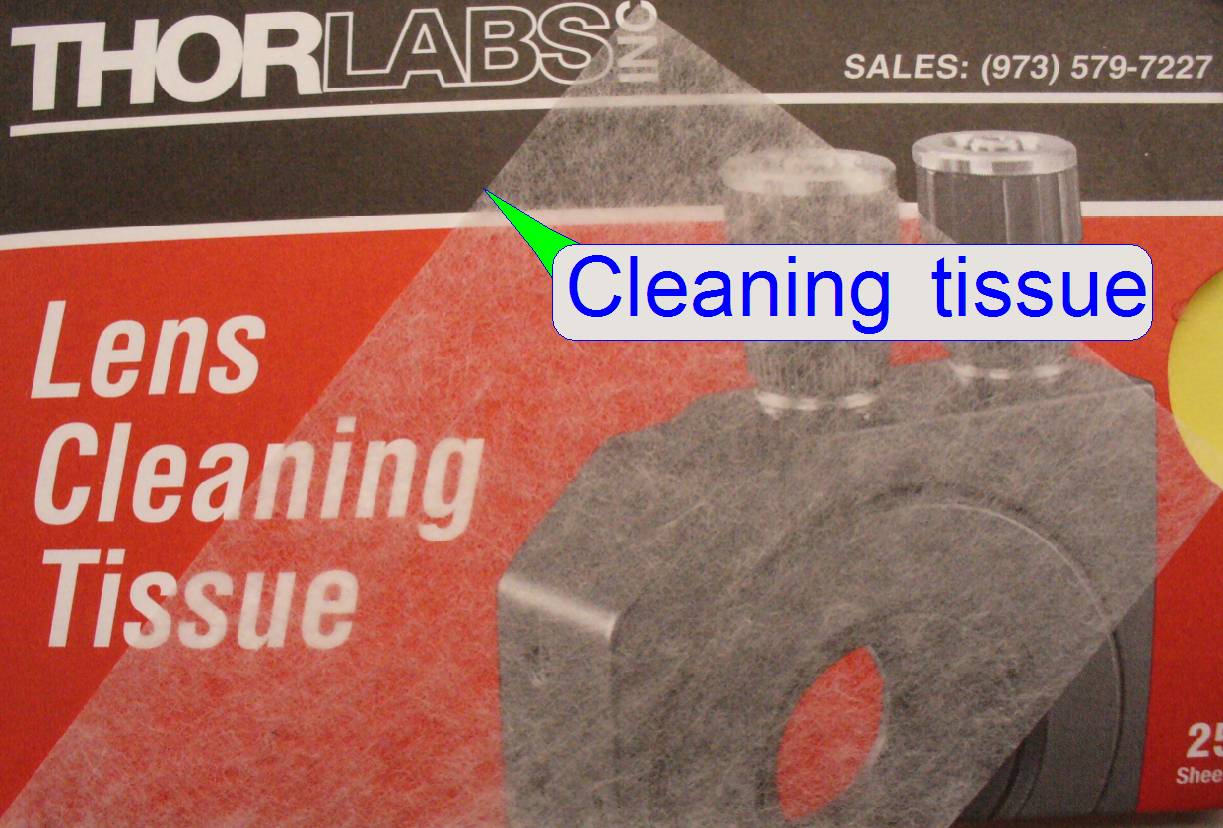 Such lens cleaning
tissues do not scratch the optics surfaces; it can be used for mirrors and
lenses both; nevertheless, each surface of the tissue can be used for one wipe
only!
Such lens cleaning
tissues do not scratch the optics surfaces; it can be used for mirrors and
lenses both; nevertheless, each surface of the tissue can be used for one wipe
only!
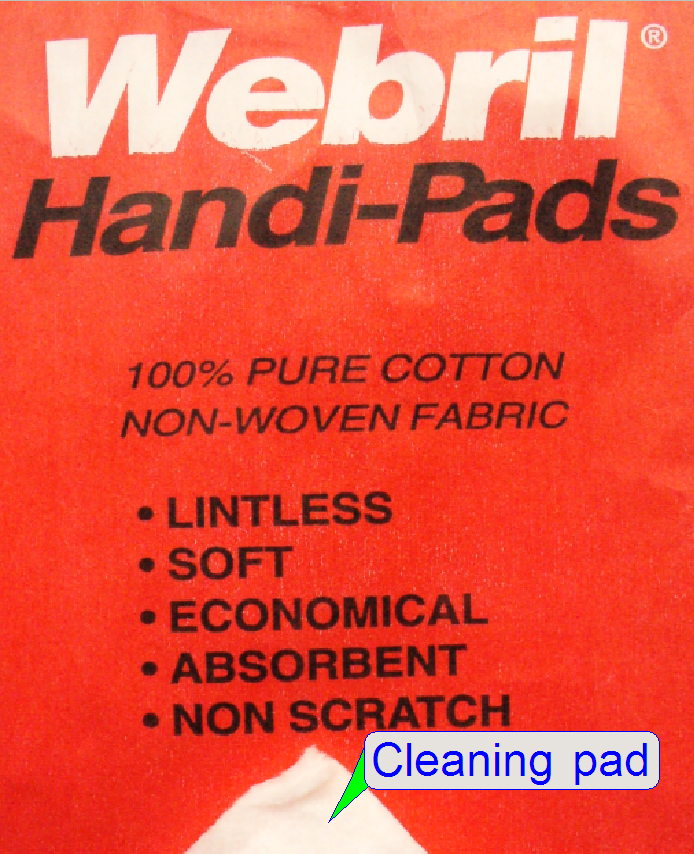 Because the size of one
of these pads is large (100x90 mm), and large pads are seldom needed, it can be
cut in halves, quarters or strips.
Because the size of one
of these pads is large (100x90 mm), and large pads are seldom needed, it can be
cut in halves, quarters or strips.
These pads are often
used to remove dust from borders of the lens or edges of mirrors. The surface
of the pad can be used also only for one wipe.
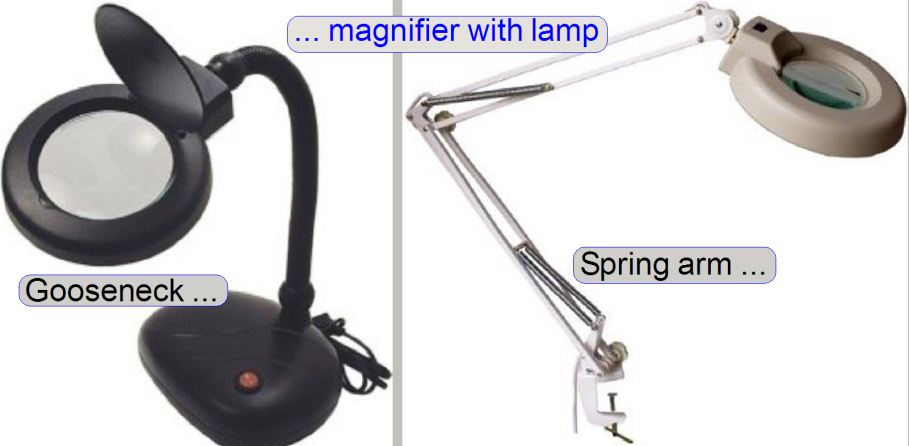 To find the dust
particles or fingerprints on the optical surface a magnifier lamp with a
magnification of at least 6 times is recommended; the type is unimportant.
To find the dust
particles or fingerprints on the optical surface a magnifier lamp with a
magnification of at least 6 times is recommended; the type is unimportant.
�
In practice, any kind of appropriate magnifier can be
used also.
Decide, where the dust can be found
It happens, that the result of the scan process shows
unwanted effects; the reason may be dust, fingerprints, or unwanted
illumination effects.
If dirt is the reason for the unwanted appearance, it
is important to decide, on which component(s) the dust or dirt is situated on.
First, check the scan quality with different slides
and tissues; analyze and compare the scanned results carefully. For this
purposes, clean the cover slip top and the slide bottom surface before the
slide will be scanned. Decide in which part the dirt may be found; in the image
path or in the illumination path. In the image path the contour of the dirt is
shown often not in focus and on each FOV, always on the same place; while in
the illumination path the dirt creates darker spots, also always at the same
place of each FOV.
�
If dust or fingerprints are on the cover slip, you
often have difficulties with focusing, the focus position can be found on the
dust and not on the surface of the sample; so often �FOV�s out of focus� are
produced in the virtual tissue.
The clean FOV
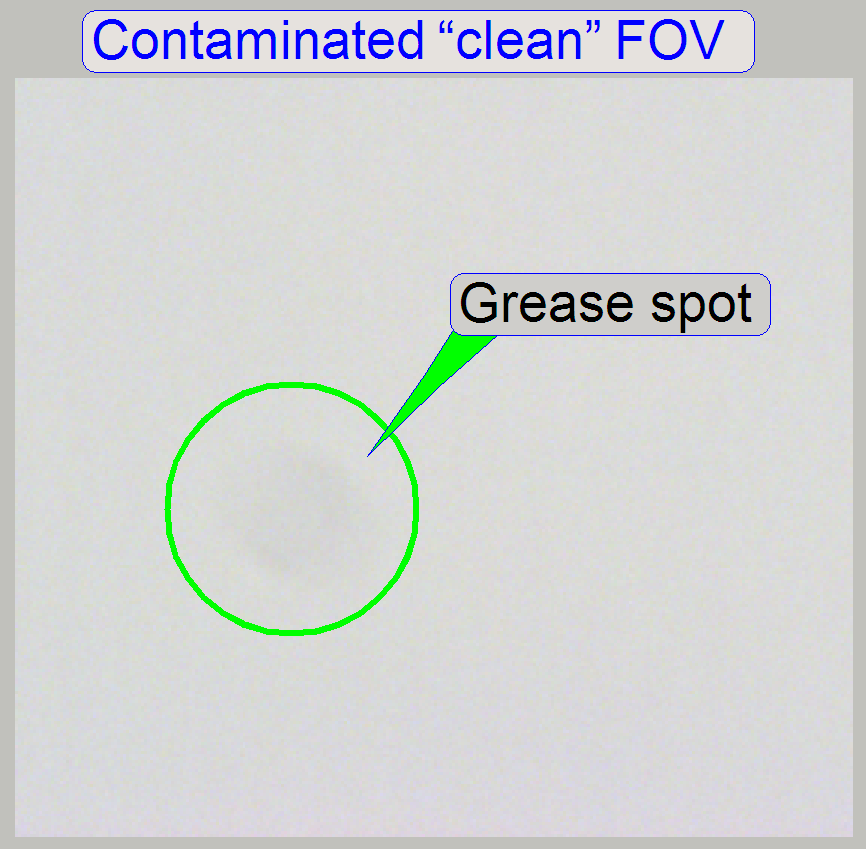 �Clean� FOV means that
the observed area of the slide, covered with the cover slip, seen by the scan
camera with 1 exposure, is free of tissue and dirt. If the live view is changed
to another slide position, and the dirt does not move, the optical path is
contaminated with dirt.
�Clean� FOV means that
the observed area of the slide, covered with the cover slip, seen by the scan
camera with 1 exposure, is free of tissue and dirt. If the live view is changed
to another slide position, and the dirt does not move, the optical path is
contaminated with dirt.
On the other side, if the scanned tissue shows the
same occurrences, always on the same position of the scanned field of view, the
check for cleanness of the illumination and image path should be performed in
the live view with a clean field of view.��
This will be used during detecting the dirty surface
also. By checking the clean FOV, the kind of the observed occurrence should be
the same as in the scanned tissue. Try also with different clean FOVs.
For more information about the mechanical construction
and adjustment procedures of the optics and the brightfield
illumination see the chapter �Optics and brightfield illumination�.
The contamination of
the image path can be situated on:
� The cover glass of the camera�s CCD.
� Both sides of the camera adapter�s lens, if
the magnification differs from 1.0x.
�
Both sides of the tube lens.
�
Both sides of the objective.
�
The top of the cover slip.
Dust or dirt on parts
of the brightfield illumination may be found on:
� The surface of the
slide on illumination side.
� Both surfaces of the condenser.
�
The surface of the illumination mirror.
�
Both surfaces of the diffuser.
�
Both surfaces of the aspheric lens.
�
The surface of the illumination source.
If the contamination is found inside the tissue, it
means, between cover slip and slide, the quality of this virtual tissue can not be increased; and this may be also a reason for
parts out of focus in the virtual tissue! Check this behavior first before
starting any cleaning of components!
1. Clean the
slide bottom and the cover slip top
This procedure is done
easily, because these surfaces are not coated. Nevertheless do not scratch the
surfaces!
�
The scratched cover slip results in focusing
difficulties as described for dust;
�
The scratched slide surface results in difficulties
with the illumination.
1. With the manual air
blower remove loosen dust and check the surfaces with a magnifier.
2. To remove fingerprints
and grease, use some drops of ethanol on a cotton towel or a cotton pad and
wipe the surfaces carefully as necessary.
2. Find the
contaminated surface in the image path
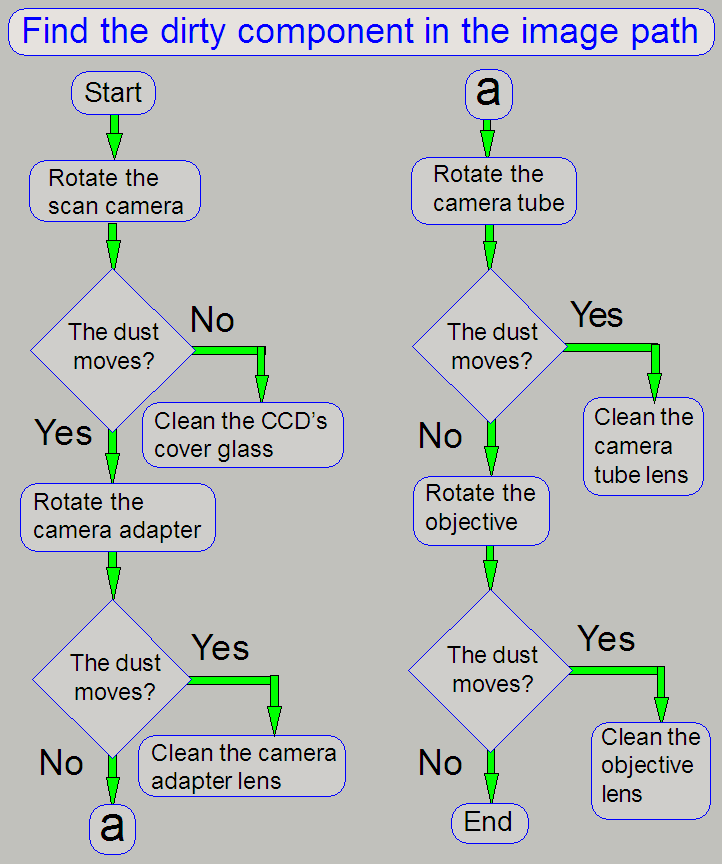 By rotating the
components of the image path separately, the dirty or dusty component can be
found.
By rotating the
components of the image path separately, the dirty or dusty component can be
found.
The best is starting
with the CCD surface and going into the direction to the cover slip. After
cleaning any part, the entire optical path should be checked again; see also �Optics and brightfield
illumination�; �Check the
optical adjustments�.
Rotate
the camera a little bit on the mounting to the camera adapter
and observe the live view. If the dust or spot does not move, the
cover glass of the cameras CCD should be cleaned.
If the dirt moves in
the live view so as you are changing the camera rotation angle, the dirt is not
found on the CCD cover glass of the camera; proceed with the next step.
Rotate
the camera adapter. Hold the camera tube and the scan camera in constant
position to each other and rotate only the camera adapter. If the
dust or spot moves, the camera adapter lens has to be cleaned.
After dismounting the
camera adapter, use a magnifier to see and find the contamination on the
surface of the lens; blow away loosen dust first before cleaning the
appropriate surface.
Rotate
the camera tube. Loosen the camera tube
clamp and the camera adapter (not the tube mounting bolts!); then hold the
camera adapter and the scan camera in constant position to each other and
rotate only the camera tube. If the dust or spot moves, the camera tube lens
has to be cleaned.
After dismounting the
camera tube, use a magnifier to see the contamination on the surface of the
lens; clean the appropriate surface, see also �to clean the camera tube lens�.
Rotate
the objective. If the dust or spot moves, the objective lens has to
be cleaned.
After dismounting the
objective, use a magnifier to see the contamination on the surface of the lens;
clean the appropriate surface, see also �to clean the objective�.
3. Find the
dirty component in the illumination path
This task is more
complicated, because an adequate routine like described for the image path can not be made. If you think, that there will be a
contamination in the illumination path, each component has to be checked separately
by using the magnifier. Preventive cleaning of the illumination source (the
halogen lamp) and the diffuser can be done, because these components are not
surface coated.
�
The illumination path may be dirty if the dust is
always visible (nearly in focus) over the entire focus range.
Precautions; mainly if dust free
surroundings are not given
� Switch off air
conditions, fans and other air blowing equipments; close doors and windows.
� Clean the surrounding
and the table where the optics should be cleaned. To avoid dust clouds in the
air, use a wet (moistened) towel for cleaning.
�
Use a clean, lint-free cotton towel as a working
surface; this can avoid scratching the surfaces if the mirror or lens may
perhaps fall out of your fingers.
�
Remove the optical component to be cleaned from the
scanner and place it onto the work area.
�
Wash your hands before starting the cleaning
procedure; so dust and grease will be removed from your fingers and can not occur on the finger coats or cleaning tools.
�
Arrange the tools and utilities on the table so, that
these can be reached by your hands easily but the direct working surface should
be left free.
�
Never dry-up liquid cleaned optical surfaces with a
fan or hair-dryer after cleaning; dust will be blown onto the surface again! Do
not blow air with your mouth onto the optical surface!
�
Never do the cleaning procedure in hurry, be always
carefully and foresighted and exercise patience; the success needs time.
�
Pull the latex finger coats over thumb, forefinger and
middle finger of both hands before you touch the optics.
�Blowing away
dust from �sunk-in� surfaces
� 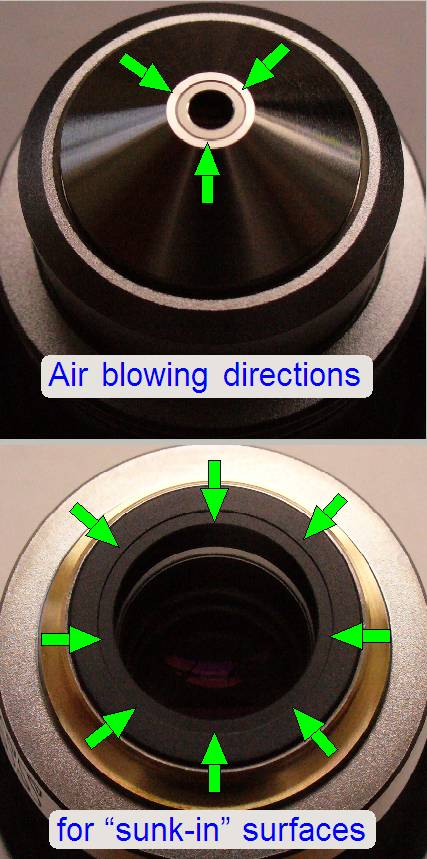 Often optical surfaces
like lenses or cover glasses are mounted with a �sunk-in� solution to protect
them against scratching; this makes it more difficult to clean them.
Often optical surfaces
like lenses or cover glasses are mounted with a �sunk-in� solution to protect
them against scratching; this makes it more difficult to clean them.
� Blow with the manual air blower from
different directions more times the surface of the lens, so lint and loosen
dust particles can be removed from the edge of the lens also.
�
Check the result with the magnifier.
�
Repeat the procedure if necessary.
Blowing away
dust from plane surfaces
�  Blow with the manual air blower from
different directions more times the surface of the mirror, so lint and loosen
dust particles can be removed from the edge of the mirror also.
Blow with the manual air blower from
different directions more times the surface of the mirror, so lint and loosen
dust particles can be removed from the edge of the mirror also.
� Check the result with
the magnifier.
�
Repeat the procedure if necessary.
Create the tool for cleaning
plane surfaces with liquid
� 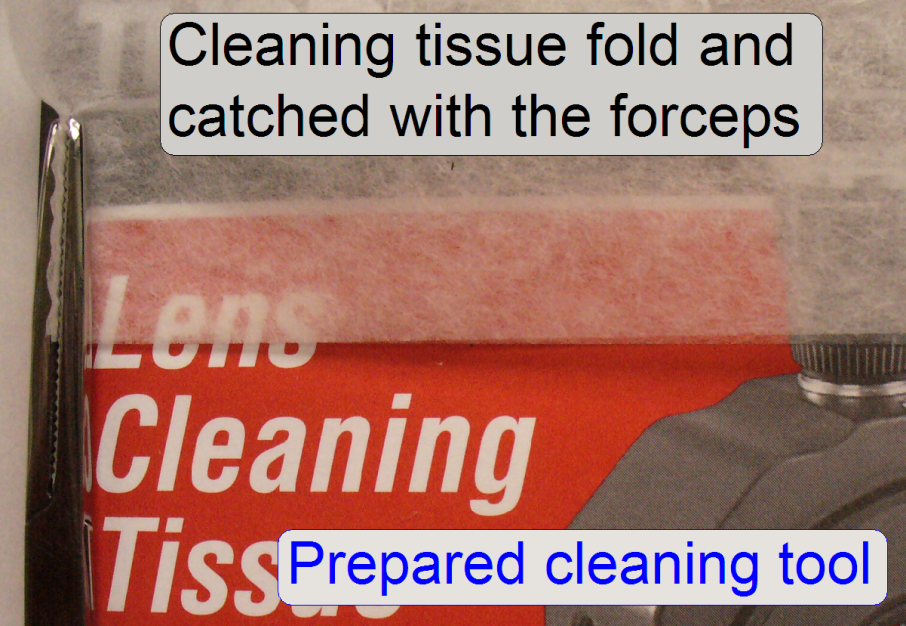 Take a lens cleaning
tissue and fold it in the middle of the shorter edge, if the mirror or the
plane surface to be cleaned is small.
Take a lens cleaning
tissue and fold it in the middle of the shorter edge, if the mirror or the
plane surface to be cleaned is small.
� Clamp the forceps at
one shorter edge, so a long tissue is created for cleaning plan surfaces.
Clean plane surfaces with liquid
 Proceed with the
following steps only if the loosen dust was already removed and grease or
fingerprints exist; see also �Blowing away
dust from plane surfaces�.
Proceed with the
following steps only if the loosen dust was already removed and grease or
fingerprints exist; see also �Blowing away
dust from plane surfaces�.
a.
Wet the entire surface of the created cleaning tissue
(see above) with the cleaning
liquid.
b.
Wipe the surface carefully, without pressure; only in
one direction and only one time. The adhesion force of the liquid will hold the
tissue on the surface of the mirror, if the tissue is wet enough.
c.
Rotate the
forceps by 180 degrees and repeat from step �a� with the other, clean
surface of the cleaning tissue.
d.
Wait 10 to 20 seconds until the liquid is evaporated
from the mirror surface; then check the result with the magnifier.
e.
If necessary, you can try to blow away dust or lint
with the manual air blower.
f.
If schlieren occurred
(wiping the surface left marks on the surface; it happens often if the dirt is
a fingerprint or grease), repeat from step �a� with a new prepared tool.
g.
If the cleaning procedure was successful, protect the
surface or mount the unit immediately.
Create the tool for cleaning
�sunk-in� surfaces with liquid
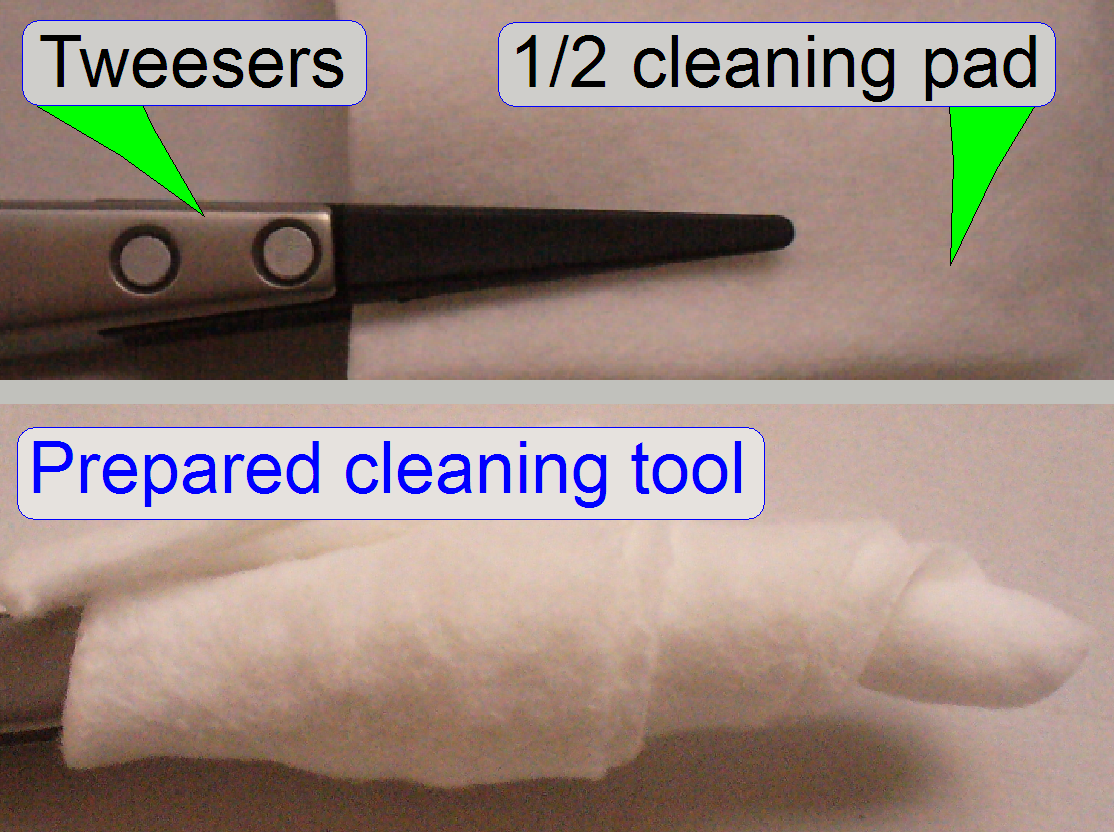 Prepare the tweezers
with a cleaning pad as follows:
Prepare the tweezers
with a cleaning pad as follows:
1. Cut a cleaning pad into
two longer halves.
2.
Hold the end of the cleaning pad half with the
tweezers so, that the peak of the tweezers reaches nearly until the middle of
the cleaning pad.
3.
Wrap the pad around the tweezers as shown.
Cleaning �sunk-in� surfaces with
liquid
 Proceed with the
following steps only if the loosen dust was already removed and grease or
finger prints exist; see also above �Blowing away
dust from sunk-in surfaces�.
Proceed with the
following steps only if the loosen dust was already removed and grease or
finger prints exist; see also above �Blowing away
dust from sunk-in surfaces�.
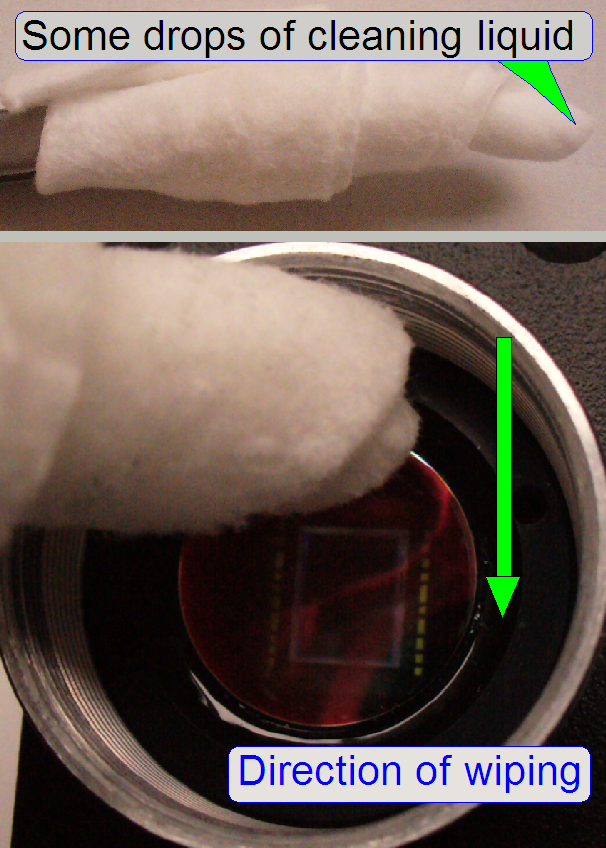
a. Wet the peak of the created
tool (see above) with some drops of the cleaning liquid.
b. Wipe the surface
carefully, without pressure only in one direction and only one time!
c. Wait 10 - 20 seconds
until the liquid is evaporated, then check the result with the magnifier.
d.
If necessary, you can try to blow away dust or lint
with the manual air blower
or use the lens brush to remove
lint from the border.
e.
If schlieren occurred
(wiping the surface left marks; it happens often if the dirt is a fingerprint
or grease), repeat from step �a� with a new prepared tool.
f.
If necessary, prepare the next tool with the other,
unused half of the cleaning pad, rotate the object to be cleaned by about 45
degrees and repeat from step �a�. If the cleaning procedure was successful,
protect the surface with the clean dust cup or mount the unit immediately.
Clean the cover glass of the
camera�s CCD (often surface coated)
a. 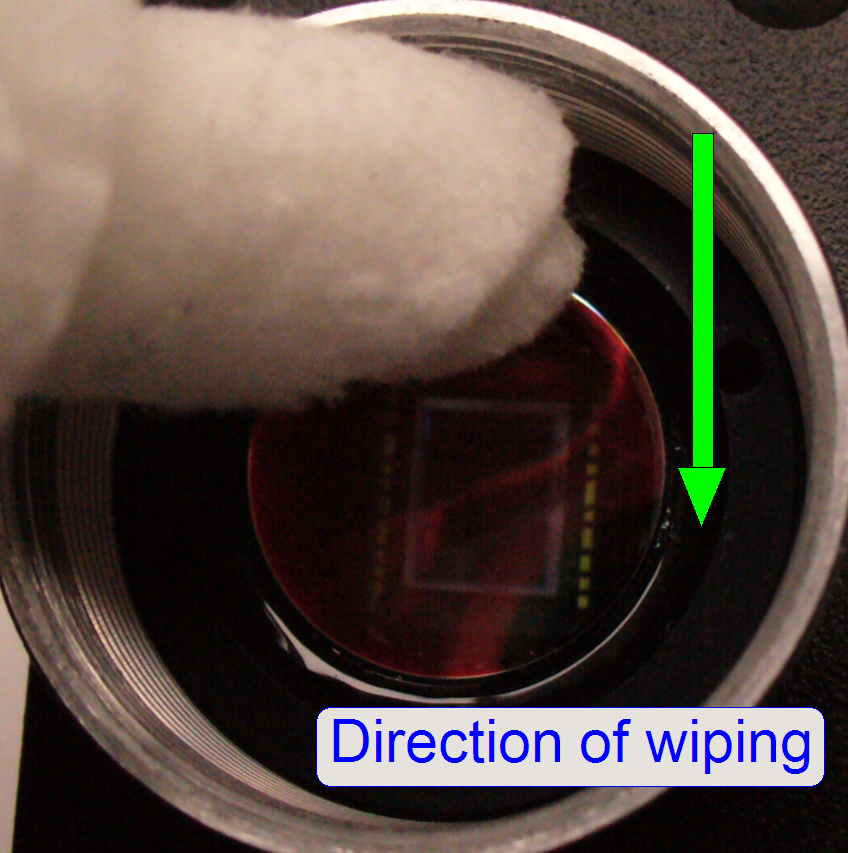 By using the air
blower, loosen dust will be removed; blow the air from different angles onto
the surface (see above �Blowing away
dust from sunk-in surfaces�. Do not remove the cover glass from the CCD of
the camera for this purpose!
By using the air
blower, loosen dust will be removed; blow the air from different angles onto
the surface (see above �Blowing away
dust from sunk-in surfaces�. Do not remove the cover glass from the CCD of
the camera for this purpose!
b.
Check the surface with an appropriate magnifier and
determine the location and the kind of dirt.
c.
Clean the surface as described above �Clean �sunk-in�
surfaces with liquid�.
d.
Look at the surface by using an appropriate magnifier
and check the surface for dust or other contaminations and the position.
e.
If necessary, lint can be removed from the cover glass
border by using the manual air
blower or the lens brush.
Clean
the lens of the camera adapter (surface coated)
a. Dismount the camera
adapter and check both surfaces of the lens with an appropriate magnifier and
determine the location and the kind of dirt.
b.
Use the air blower to remove loosen dust; see also �Blowing away
dust from sunk-in surfaces�.
c.
Clean the surface as described above �Clean �sunk-in�
surfaces with liquid �.
d.
Look at the surface by using an appropriate magnifier
and check the surface for dust or other contaminations and the position.
e.
If necessary, lint can be removed from the lens border
by using the manual air
blower or the lens brush.
Clean the tube lens (surface
coated)
a. 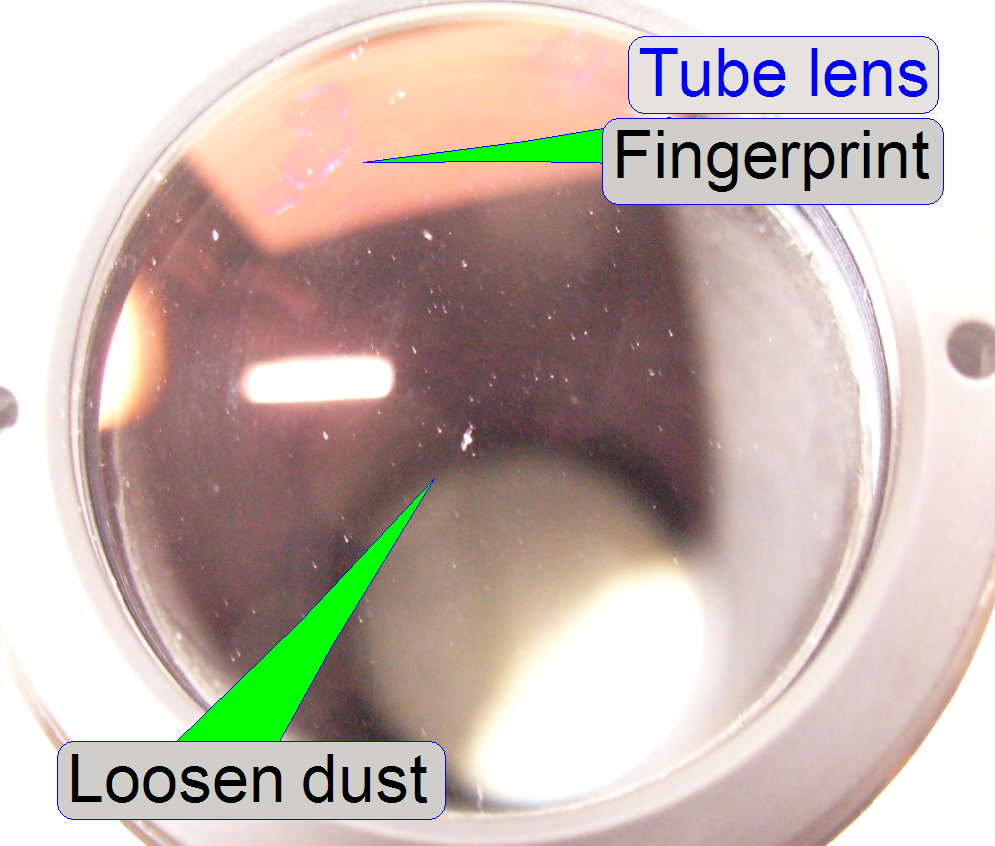 By using the air
blower, loosen dust will be removed; blow the dust from different angles on
both surfaces (see above �Blowing away
dust from sunk-in surfaces�.
By using the air
blower, loosen dust will be removed; blow the dust from different angles on
both surfaces (see above �Blowing away
dust from sunk-in surfaces�.
b.
Check both surfaces with an appropriate magnifier and
determine the location and the kind of dirt; dismount the tube lens if
necessary.
c.
Use the air blower to remove loosen dust; see also �Blowing away
dust from sunk-in surfaces�.
d.
Clean the surface as described above �Clean �sunk-in�
surfaces with liquid �.
e.
Look at the surface by using an appropriate magnifier
and check the surface for dust or other contaminations and the position.
f.
If necessary, lint can be removed from the lens border
by using the manual air
blower or the lens brush.
Clean the objective (surface
coated)
a. 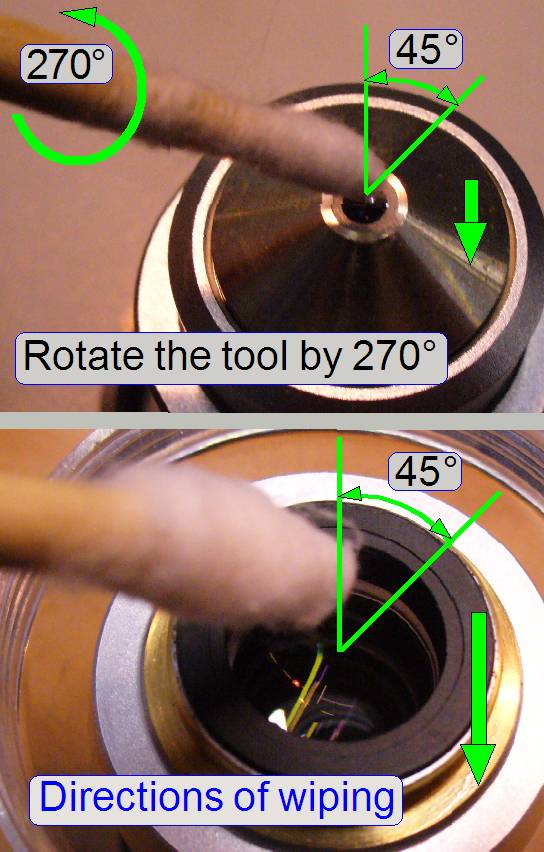 Remove the loosen dust
as described under �Blowing away dust
from sunk-in surfaces�.
Remove the loosen dust
as described under �Blowing away dust
from sunk-in surfaces�.
b. Clean the metal
protector part of the lens.
c. Check the position and
the kind of contamination with the magnifier.
d. If necessary, prepare
the cleaning tool as described above, the created Wooden or bamboo tool.
e. Rotate the prepared
tool by approx. 270� on the lens, without pressure.
f. Check the result with
the magnifier.
g. Exchange the cotton
batting, rotate the objective by approx. 45º and repeat from step �d� as
necessary.
h. If necessary, lint can
be removed from the lens border by using the manual air blower or
perhaps the lens brush.
Clean the brightfield
condenser
a. 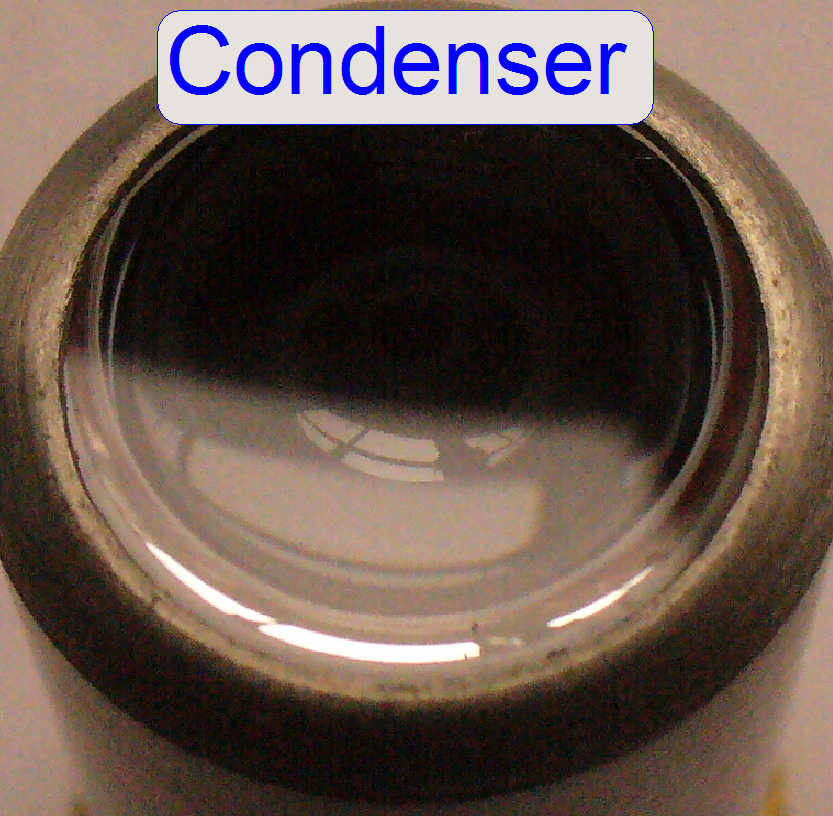 Remove the loosen dust
as described under �Blowing away
dust from sunk-in surfaces�.
Remove the loosen dust
as described under �Blowing away
dust from sunk-in surfaces�.
b.
Check the position and the kind of contamination with
the magnifier.
c.
If necessary, prepare the cleaning tool as described
above �Create
the tool for cleaning �sunk-in� surfaces
with liquid�.
d.
Execute the procedure �Clean �sunk-in� �surfaces with liquid�
e.
If necessary, lint can be removed from the lens border
by using the manual air
blower or perhaps the lens brush.
Clean the brightfield
illumination mirror (surface coated)
a. 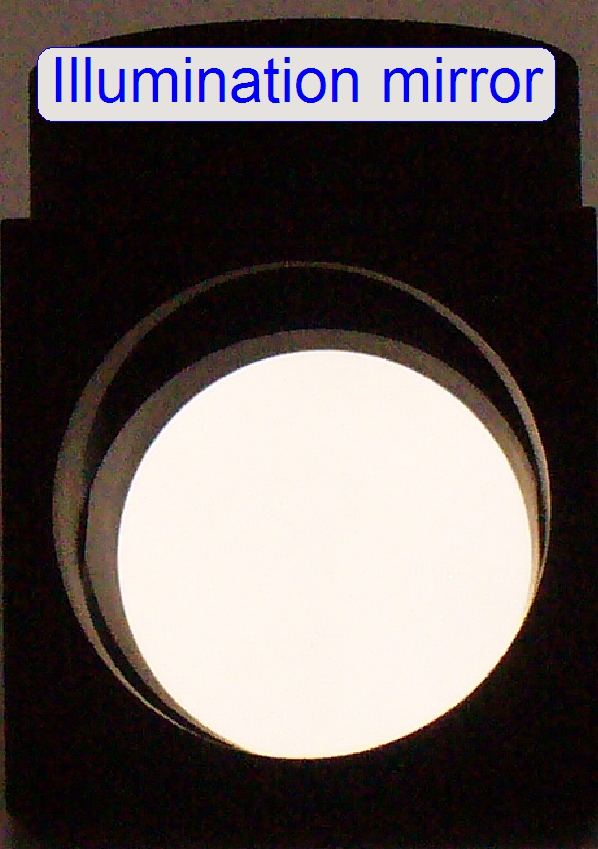 Remove the loosen dust
as described under �Blowing away
dust from plane surfaces�.
Remove the loosen dust
as described under �Blowing away
dust from plane surfaces�.
b. Check the position and
the kind of contamination with the magnifier.
c. If necessary, prepare
the cleaning tool as described above �Create the
tool for cleaning �sunk-in� surfaces
with liquid�. The tool should be smaller as shown above.
d. Execute the procedure �Clean �sunk-in� surfaces with liquid�;
use any opening to reach the contamination.
e. If necessary, lint can
be removed from the mirror border by using the manual air blower or
perhaps the lens brush.
Clean the aspheric lens or the
diffuser
a. 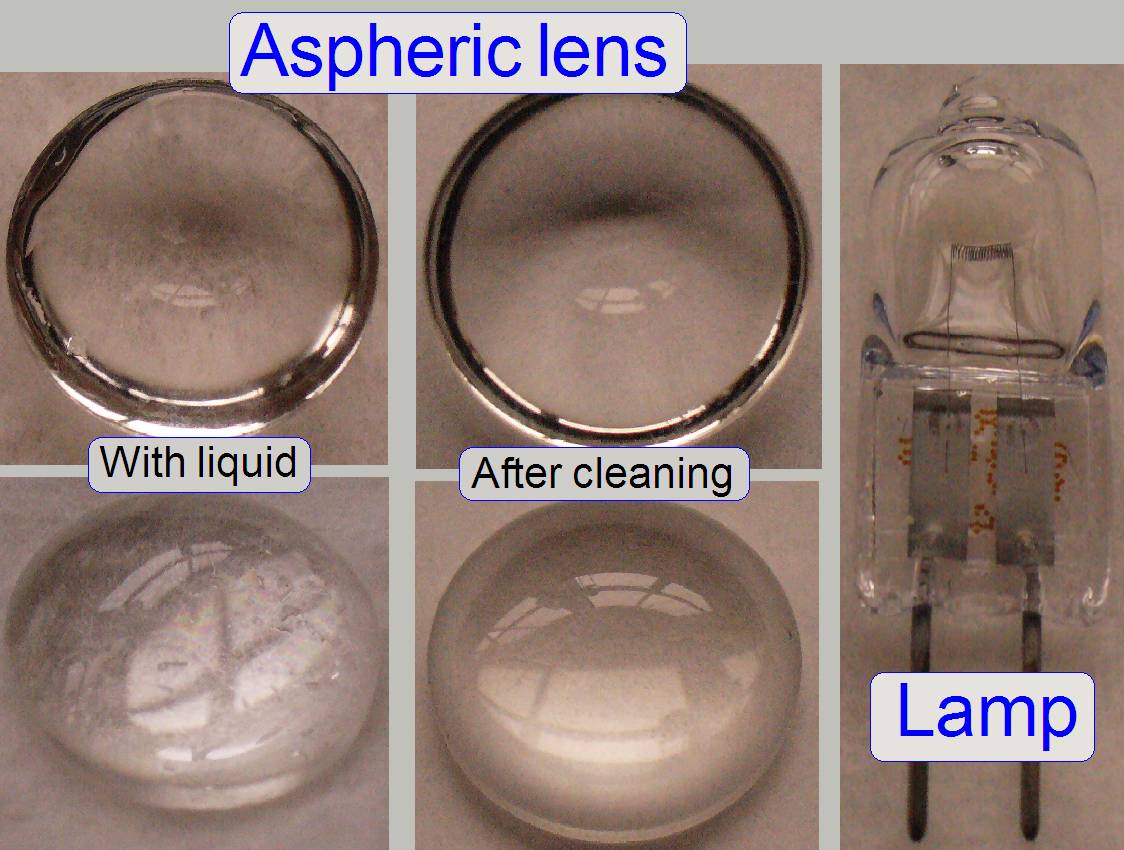 Remove the loosen dust
as described under �Blowing away
dust from sunk-in surfaces�.
Remove the loosen dust
as described under �Blowing away
dust from sunk-in surfaces�.
b.
Check the position and the kind of contamination with
the magnifier.
c.
If necessary, put a cleaning pad onto the table and
the aspheric lens on it.
d.
Spend some drops of cleaning liquid onto the surface
and wipe the surface carefully.
e.
Rotate the lens or diffuser by 180º and repeat
step �d�.
If necessary, lint can be removed from the lens or
diffuser by using the
manual air blower or the lens
brush after drying up.
Clean the illumination source
Use a cleaning pad and
cleaning liquid to clean up the halogen lamp. Hold the lamp on the connector
pins and clean the entire glass surface of the lamp.
Check the cleanness of
the lamp with the magnifier.
Clean the preview mirror (surface
coated)
f. 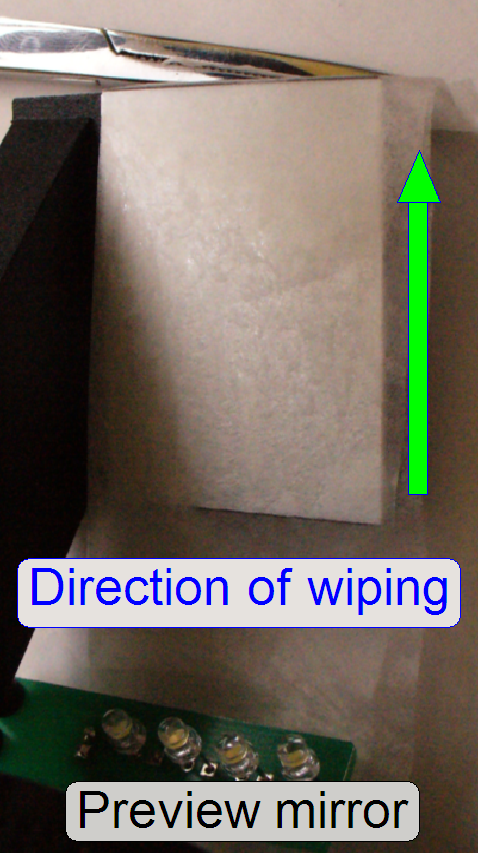 Remove the loosen dust
as described under �Blowing away
dust from plane surfaces�.
Remove the loosen dust
as described under �Blowing away
dust from plane surfaces�.
g.
Check the position and the kind of contamination with
the magnifier.
h.
If necessary, prepare the cleaning tool as described
above �Create
the tool for cleaning plane surfaces with liquid�.
i.
Execute the procedure �To clean plane surfaces with
liquid�
j.
If necessary, lint can be removed from the mirror
border by using the manual
air blower or the lens brush.
Clean the fluorescent
illumination mirror (surface coated)
a. 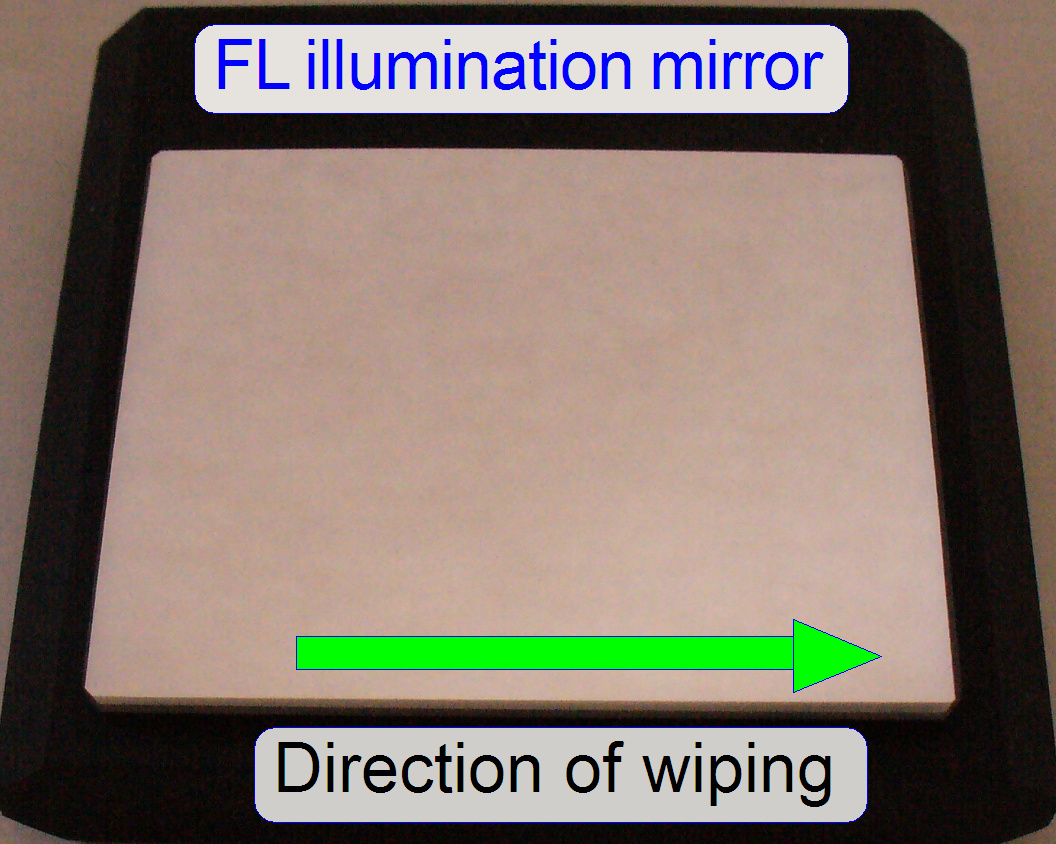 Dismount the
fluorescent illumination mirror if necessary.
Dismount the
fluorescent illumination mirror if necessary.
b. Remove the loosen dust
as described under �Blowing away
dust from plane surfaces�.
c.
Check the position and the kind of contamination with
the magnifier.
d. If necessary, prepare
the cleaning tool as described above �Create the tool for
cleaning plane surfaces with liquid�.
e. Execute the procedure
�To clean plane surfaces with liquid�
f. If necessary, lint can
be removed from the mirror border by using the manual air blower or the lens brush.
Clean the fluorescent condenser
(surface coated)
a. 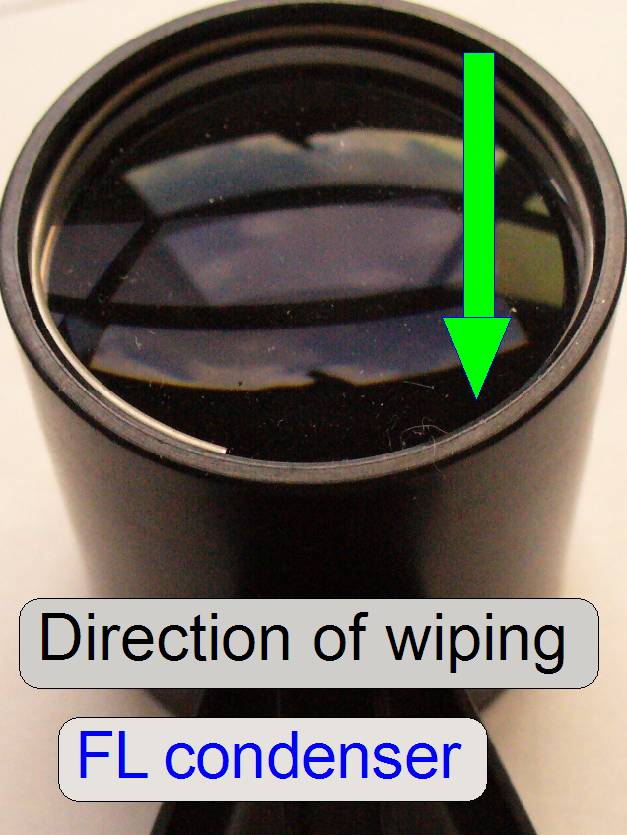 By using the air
blower, loosen dust will be removed; blow the dust from different angles on
both surfaces (see above �Blowing away
dust from sunk-in surfaces�.
By using the air
blower, loosen dust will be removed; blow the dust from different angles on
both surfaces (see above �Blowing away
dust from sunk-in surfaces�.
b.
Check both surfaces with an appropriate magnifier and
determine the location and the kind of dirt; dismount the lens if necessary.
c.
Use the air blower to remove loosen dust; see also �Blowing away dust from sunk-in surfaces�.
d. Clean the surface as
described above �To clean �sunk-in� surfaces with liquid �; if the lens is
dismounted, use the procedure as described above �To clean plane surfaces with
liquid�.
e.
Look at the surface by using an appropriate magnifier
and check the surface for dust or other contaminations and the position.
f.
If necessary, lint can be removed from the lens border
by using the manual air
blower or the lens brush.